Overview
The current Milestone release contains updated versions of the following files:
- Heartland Restaurant POS
- Heartland Restaurant Admin Portal
- Heartland Restaurant Kiosk
- Heartland Restaurant Guest
If you have questions regarding the updates described in this document, please contact Heartland Restaurant's Support Department by email (Earlyaccess@heartland.us) or phone (1-833-844-HPOS).
New Enhancements
The following section includes detailed descriptions of the enhancements included in this Milestone. We have divided the updates by project area.
POS
The following release notes detail any enhancements we have made to the Point-of-Sale program for this release.
POS Can Now Read Barcodes Embedded with Weight or Price Data
We have added settings for configuring the POS to read barcodes with embedded weight and price codes. Embedded barcodes are coded numbers that combine a product’s SKU number with its price or weight, often separated with a special character.
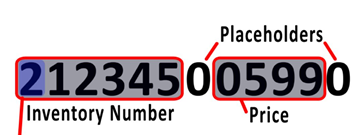
To access these settings, in the Main Menu, click Location Setup, then click Settings. In the Advanced Settings area, we have added the controls needed to configure the POS to read barcodes featuring embedded weight or price amounts. In the Embedded Barcode Type list, select the type of embedded barcode that the POS will read. If you want the POS to read barcodes that include an embedded weight amount, select Weight. If you want the POS to read barcodes that include an embedded price amount, select Price. If you do not want the POS to read either type of embedded codes, select None. If you select Price or Weight in the Embedded Barcode Type list, the program will display additional controls for configuring barcodes.
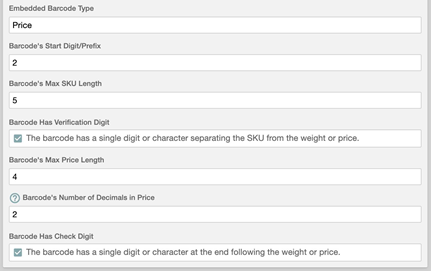
In the Barcode's Start Digit/Prefix box, enter the appropriate start digit/prefix. In the Barcode's Max SKU Length box, enter the maximum number of digits of the SKU part of the embedded barcode. The price or weight amount will be combined with the SKU part.
Select the Barcode has Verification Digit check box if the barcodes will include a verification digit, a single digit or character separating the SKU from the weight or price. In the Barcode's Max Price Length box, enter the maximum number of digits of the price amount in the barcode. In the Barcode's Max Weight Length box, enter the maximum number of digits of the weight amount of the barcode.
In the Barcode's Number of Decimals in Price box, enter the maximum of decimals that the program will use for the price amount. In the Barcode's Number of Decimals in Weight box, enter the maximum of decimals that the program will use for the weight amount.
Select the Barcode Has Check Digit check box if the barcodes include a single digit or character at the end of the price or weight component.
POS Holds Tokens in Online Orders
For those processing Online Order payments through Heartland, when an order comes in from Online Ordering, the POS now holds the token so the server can void it or ring additional items and recharge the token without needing the card present. This function, formerly supported by Monetary, is now also supported by Heartland.
Process Gift from Online Ordering and on PAX Devices In-Store
You can now configure the POS to process Heartland Gift transactions from both the Online Ordering service and on PAX devices within the store.
- In the Main Menu, under Location Setup, select Payment Gateway.
- In the In-Store Settings area, in the EMV Solutions list, select PAX.
- In the Gift Card list, select PAX.
- In the Online Settings area, select the Heartland Gift check box.
This will enable the site to process gift transactions to be processed within the store on PAX devices, while also processing Heartland Gift purchases and redemptions from the Online Order service.
Hide Future Orders Control Added to POS Device Options
In the POS Device Options, we have added the Hide Future Orders control. The Hide Future Orders enables you to set the maximum number of days ahead of the current day that forthcoming future orders will be displayed by the POS. To access this control, run the POS. Open the Settings/Manager menu (top right corner). Tap Settings/Manager, then tap General. The Hide Future Orders control is listed under Device Options.
Heartland Portico Supports Credit Card Pre- and Incremental Authorizations
Sites using the PAX terminals can now preauthorize credit cards. With this feature, a customer can swipe a credit card and the POS authorizes it to later be captured without the card being present.
For sites using the Heartland Portico transport, you can also set the PAX preauthorization to increment. As more items are added to the check, the POS will renew the card’s authorization periodically, without the card being present.
Fast Cash Option Added to POS
We have added a Fast Cash payment option to the POS. To access the control, click Location Setup in the Main Menu, then click Rooms. In the Rooms screen, select a room in the left-hand panel. In the room settings (right-hand panel), we have added the Fast Cash check box. If you clear the check box, the POS will not include the Fast Cash option. If you select this check box, the POS will display the Fast Cash button as a ticket option when you pay a check associated with the room. If you tap Fast Cash, the POS will allow you to tender the check immediately to cash without accessing the Checkout screen.
POS Prevents Duplicate Charges for Interrupted Online Orders
In previous versions, on sites using the Monetary service to process payments, you may have encountered a problem. In certain circumstances (such as an unstable network connection), when a customer placed an online order, the payment might have been received by the Monetary processor, even if the order was not received by the site's POS. In such cases, the customer may have repeated the order and payment, resulting in a duplicate charge. We have corrected this, and now the POS now recognizes and prevents duplicate charges for an interrupted or duplicated online order.
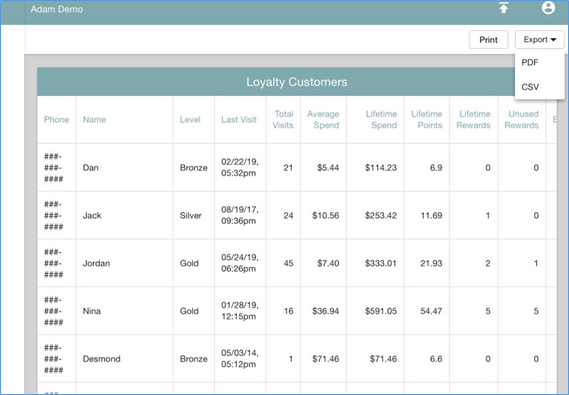
Export Gift, Account Balances, and Loyalty Reports to PDF Format
You can now export the Gift, Account Balances, and Loyalty Reports into PDF format. In the screens for these reports, if you click the Export list in the top right, the program now displays the CSV and PDF options. If you select CSV, the program will display the report's data in downloadable CSV format. If you select PDF, the program will display the report in the (printable or downloadable) PDF format. To access the Gift and Account Balances Reports, click Locations in the Main Menu, select a location, then click Reports in the menu, then click Gift or Account Balances. To access the Loyalty Report, access the top most level of the Admin Console, then click Reports in the Main Menu, then click Loyalty.
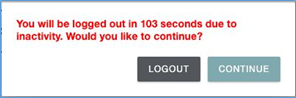
Admin Console Displays a Warning Two Minutes Before Logging Off
The Admin Console now displays a warning message two minutes before it automatically logs off. If the Admin Console is set to automatically log out after a set number of minutes, it now displays a warning message two minutes before it logs off. The warning message includes a countdown timer and two buttons, Logout and Continue. If you click Logout, the Admin Console will log you out immediately. If you click Continue, the program will remove and reset the auto logout timer.
Lengthy KDS Slips Displayed in Multiple Columns
We have modified the program to display KDS slips in multiple columns when necessary. In previous versions, if you set the POS to display KDS slips in the Scale-to-fit layout view, the POS would have displayed a lengthy KDS slip in a single column. If the slip was longer than the visible column, the POS would have extended the column beyond its visible size, forcing you to manually scroll down to view the rest of the slip. We have changed this, and now when the POS displays a lengthy KDS slip that extends beyond a single column, you can set it to display the remainder of the slip in a second column, so staff can see the entire slip without scrolling.
You can edit this setting in the POS. In the KDS screen, access the KDS Options menu by tapping in the top right corner. In the KDS Options menu, under Number of Rows, if you select Scale to Fit - Wrap, the program will wrap the text of KDS slips into the next column if the text is too long for a single column. If you select Scale to Fit - Scroll, the program will (as in previous versions) extend the column beyond the visible length in the screen, forcing you to manually scroll down to view the rest of the text in the KDS slip.

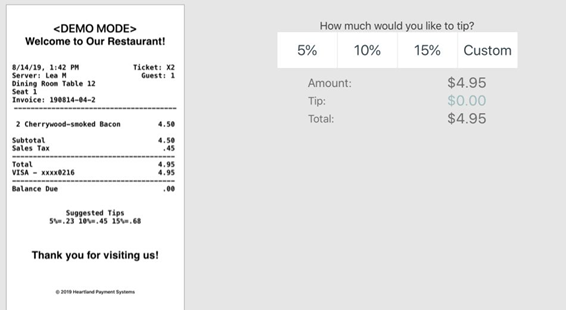
$0.00 Suggested Tip Amount Removed from All Apps
We have removed the $0.00 suggested tip amount from all Heartland Restaurant apps (including POS, Kiosk, GuestApp, Customer Display, and Online Ordering). Now, if a customer wishes to add a tip with “zero” amount, that customer must use the custom tip feature and enter a value of “0.00”.
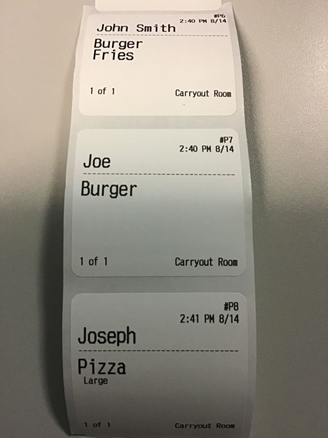
New 2.2 x 2 Option Added to Printer Label Size List
In the Display Formats window, we have added the 2.2 x 2 option to the Label Size list. In the Main Menu, click Location Setup, then click Display Formats. In the Display Format screen, click an existing record, or click New. In the settings window, if you select Kitchen Table in the Print Type list, the program displays the Label Size list. In the Label Size list, you can now select 2.2 x 2. This setting should be used for labels sized 2.2" x 2", which is a more suitable size for coffee cups. You can set the Epson L90 printer to print labels in this size. If needed, here are the part numbers for the spacer and paper:
- BlueStar Part Number for 2.2x2 Paper: 111197300
- BlueStar Part Number for Spacer: 1061966
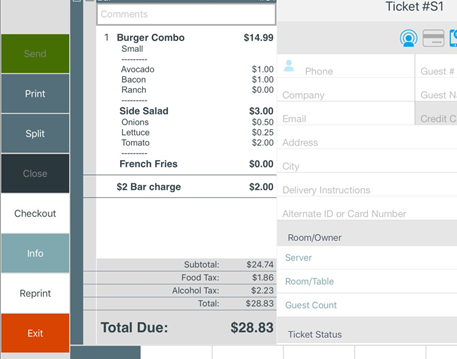
Enter Credit Card Surcharge Adjustment Charges with Decimal Values
If you apply an adjustment charge to a check that is defined as a credit card surcharge, you can now enter an amount with a decimal value. In previous versions, if you defined an adjustment as a credit card surcharge, the program would not have accepted an amount with a decimal value. For adjustments defined as anything other than a credit card surcharge, the program still requires whole numbers without decimal values.
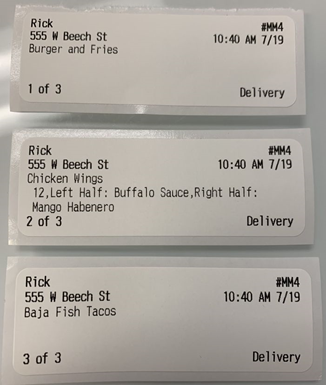
Ingredients for Combo Meal items Grouped by Item
In previous versions, when displaying a check with a combo meal, the POS listed the subitems before the main item's ingredients, which could confuse kitchen staff. To correct this, we have modified the POS to display a main item's ingredients immediately after the main item, then listing the subitems and their ingredients. The POS will also group a combo meal's items with their ingredients when printing prep tickets.
Print Scheduled Shifts from POS Clock-In/Clock-Out Screen
Servers can now print their schedules from the POS Clock-In/Clock-Out screen. In the Clock-In screen, tap the hamburger menu button in the top right corner.
The POS will display a menu. If the server has a scheduled shift, the menu will include the Print Schedule button. If you tap Print Schedule, the POS will send a copy of your shift schedule to its designated printer.
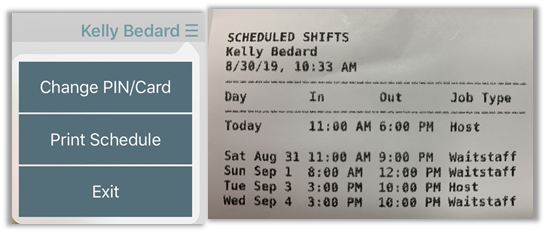
The POS only displays the Print Schedule button if the app is set to enforce labor scheduling. (To set the app to enforce labor scheduling, access the Locations Settings screen and select the Labor Scheduling check box in the App Settings area.)
Optional Forced Quantity Selection Added
In the New Menu Item screen, we have added the Prompt for Quantity option. If you select this option, the POS will prompt the server to enter a quantity manually when ordering this menu item.
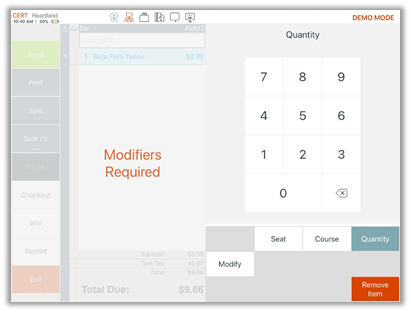
If the menu item is also associated with required modifiers, the POS will display the Quantity screen before displaying the Modify screen.
Calculate Weighted Overtime Pay for Payroll/TimeClock Reports
We have modified how the POS calculates overtime rates for staff members working multiple job types. In previous versions, the POS would apply a single overtime rate. Now, if a staff member works two or more different job types (each with different pay rates) in the same pay period, the POS will calculate the total overtime amount by multiplying the total hours worked by the weighted average of all overtime rates worked in the pay period. All reports featuring overtime rates, such as Labor Summary, will use totals calculated with this new method.
We made this change to comply with following provisions of U.S. labor law:
“Where an employee in a single workweek works at two or more different types of work for which different straight-time rates have been established, the regular rate for that week is the weighted average of such rates. That is, the earnings from all such rates are added together and this total is then divided by the total number of hours worked at all jobs. In addition, section 7(g)(2) of the FLSA allows, under specified conditions, the computation of overtime pay based on one and one-half times the hourly rate in effect when the overtime work is performed.”
For more detail, please review the following fact sheet, provided by the U.S Department of Labor. https://www.dol.gov/whd/regs/compliance/whdfs23.pdf
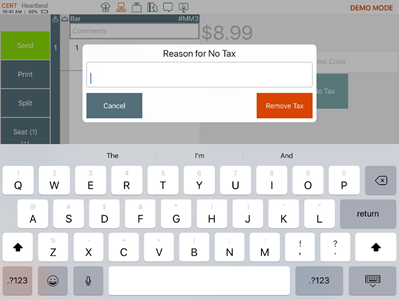
Add Notes to No Tax Adjustment Checks
In the Checkout screen, if you apply the No Tax adjustment to a check, the POS will now prompt you to enter a reason for the adjustment.
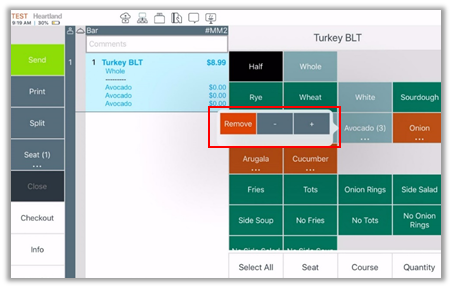
Quantity Adjust -/+ in POS Ingredients
In the POS Ingredients screen, we have added a pop-up window for editing quantity amounts. In the POS, when ordering an item, if you tap Ingredients, then press and hold a modifier button, the POS will display a pop-up window for entering a quantity. Each time you tap +, the POS will add one unit of the modifier to the main item. Each time you tap -, the POS will remove one unit of the modifier from the main item. If you tap Remove, the POS will remove all units of the modifier from the main item.
Support Auth/Capture with PAX
Sites using the PAX EMV solution can now use the Auth/Capture feature. You can enable this feature in the In-Store Settings area. To access the In-Store Settings area, click Location Setup in the Main Menu, then click Payment Gateway.
In the In-Store Settings area, if you select PAX in the EMV Solutions list, you can now select Auth/Capture in the Transaction Method list. Once Auth/Capture is enabled, your PAX device will automatically display the Auth option instead of Sale.
Admin Portal
The following release notes detail any enhancements we have made to the Admin Portal program for this release.
Alphabetical Sorting of Item Lists for Sections, Groups, and Modifiers
We have added controls for alphabetical sorting to the item lists in the Sections, Groups, and Modifiers screens. To access these screens, click Account Menu in the Main Menu, then click Sections, Groups, or Modifiers.
In the Sections screen, click New. The program opens the New Menu Section window, with controls to create a new section. This window includes the Assigned Items list, which enables you to assign multiple menu items to the menu section. After assigning multiple items to the list, you can sort the items manually. Now, if you click the Assigned Items label, the program will sort all items in alphabetical order. If you click the Assigned Items label again, the program will sort the items in reverse alphabetical order.
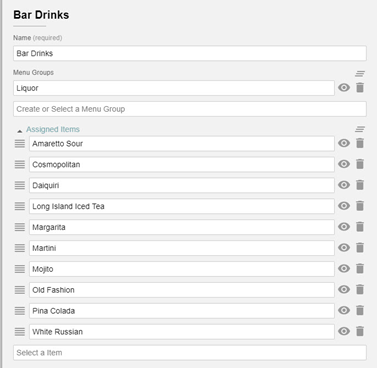
We have added a similar control to the New Menu Group window, which includes the Assigned Sections list. If you click the Assigned Sections label, the program will sort all sections in alphabetical order. If you click the label again, the program will sort the sections in reverse alphabetical order.
We have also added a similar control to the New Modifier window, which includes the Ingredients list. If you click the Ingredients label, the program will sort all items in alphabetical order. If you click the label again, the program will sort the items in reverse alphabetical order.
Privacy Policy Updated
We have updated our Privacy Policy. To review, access the Admin Console. Click the Profile icon, then click My Profile. In the My Profile screen, click View Privacy Policy.
Printer Controls Added to Scheduled Shifts Screen
In the Scheduled Shifts screen, we have added controls for printing. To access the Scheduled Shifts screen, click Location Setup in the Main Menu, then click Scheduled Shifts. In the Scheduled Shifts screen, click Create a Shift. In the Shift Settings screen, we have added the Print button. If you click the Print button, the program will open a print preview screen allowing you to preview and print the selected shift. This screen includes settings for the destination of the printed document, the number of pages, and printer layout.
This feature allows you to print shift data for whatever you add to the screen, such as shifts for specific persons or job types, with specified date ranges.
Email Marketing Integration
You can now configure Heartland Restaurant to use the Email Marketing service. For a detailed description of how to set up Heartland Restaurant to use Email Marketing, please review our article on "Email Marketing Setup for Heartland Restaurant".
New Cutting Modes Added for L90 Label Printers
We have added the Mode list to the New Printer window. To access the New Printer screen, click Location Setup in the Main Menu, then click Printers. In the Printers, screen, click New. In the New Printer screen, if you select Epson in the Brand list, then select L90 (Label) in the Series list, the program will display the Mode list. In the Mode list, you can select the cutting mode of an Epson L90 label printer. If you select Cut, the printer will automatically cut each label after printing. If you select Tear or Peel, the printer will not automatically cut labels after printing, allowing servers to remove and peel the labels manually.
Color Options Restored to Menu Item, Modifier, and Tag Screens
In a previous version, when you accessed the New Menu Item window, the Override Button Color box was available, enabling you to enter the HEX code for a desired button color. However, the default color options were removed. In this release, we have restored the default color options, and they are now available along with the Override Button Color box. If you click a default color option, the program will display the item's button in the POS with the selected color as a background. It will also insert the selected color's HEX code in the Override Button Color box.
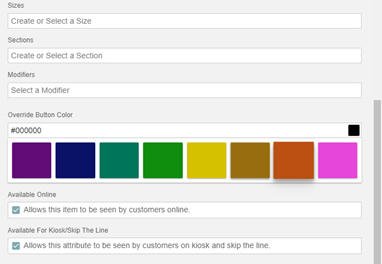
We have also restored the default color options to the New Modifier window (below the Button Color box) and the New Tag window (below the Tag Color box).
Partial Payments for Online Orders
You can now perform partial payments for online orders. When a customer makes a payment for an online order, if the amount is less than the full amount of the check, Online Ordering will prompt the guest for another payment. The POS will only accept a credit card for the second payment, and will not allow you to perform any other tasks until the second payment is made. To use this feature, the iPad used for online orders must be running version 4.5 or later.
Set POS to Require Server Checkout Before Clockout
We have added the Require Checkout Before Clockout check box to the Location Settings screen. In the Main Menu, tap Location Setup, then tap Settings. In the App Settings area, we have added the Require Checkout Before Clockout check box. If you select this check box, the POS will require servers to perform a checkout before allowing them to clock out. (In previous versions, this setting was not configurable by merchants.)
Export All Reports (except Gift Liability, Account Balances, and Loyalty) to PDF Format
You can now export all reports (other than Gift Liability, Account Balances, and Loyalty Reports) into PDF format. In the screens for these reports, if you click the Export list in the top right, the program now displays the CSV and PDF options. If you select CSV, the program will display the report’s data in downloadable CSV format. If you select PDF, the program will display the report in the (printable or downloadable) PDF format.
Kiosk, Guest Display can Display Three Graphics as Slideshow
We have added controls that enable you to upload up to three images, which the Kiosk and Guest display will display as an advertising slideshow. To access this control, click Location Setup in the Main Menu, then click App Ordering. We have added the Slide Show Images area and its controls. In the Slide Show Images area, if you tap Set Ad in one of the three available boxes, the program will open a window, enabling you to navigate to and select a graphic on the workstation. You can do this with all three of the Set Ad boxes. Later, when you run the Kiosk and Guest display, they will display the ads in these boxes as a sideshow in an ongoing loop. The Ad Duration in Seconds box enables you to configure the time (in seconds) that the program displays each image before switching to the next one.
Auto Logout Time Options Added for Users
We have added the Auto Logout Time list to the New User screen (for new users) and the My Profile screen (for the existing current user). In this list, you can select an automatic logout time of 15, 30, or 60 minutes. If you log into the Admin Console and are inactive for the selected number of minutes, the program will automatically log you out. The default auto logout time for all users is 15 minutes.
Retrieve New API Keys on Integrations Page
Dealers can now retrieve new API keys for their integration partners in the Admin Portal, on the Integrations page.
- In the Main Menu, click Integrations. The Integrations page will display for all dealers in a location.
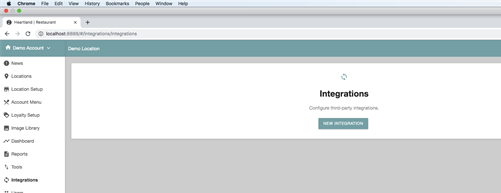
- In the Integrations page, click New Integration. The program displays the Integration panel.
- In the Integration Type box, type “API”. Currently, the only integration available is API.
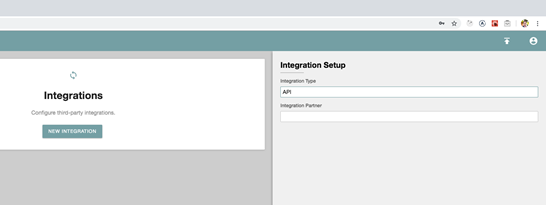
- In the Integration Partner list, select the approved integration partner that will use the API service.
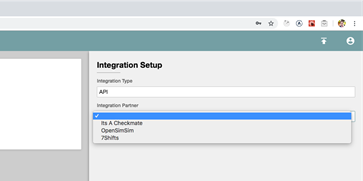
- Click Save in the Command Bar.
The program will display a valid API key.
Admin Settings Added to Location Settings Screen
The Admin Settings are now visible in the Location Settings screen. To access these controls, click Location Setup in the Main Menu, then click Settings.
Tip Limit Removed
In previous versions, the program would not allow you to enter a tip greater than $100 for online orders. We have removed this limit, and you can now enter tips of any amount for online orders.
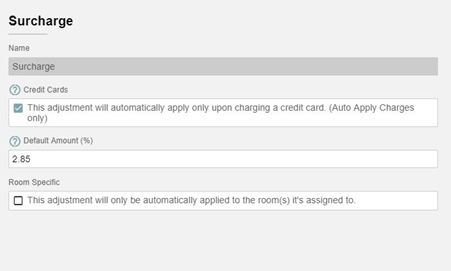
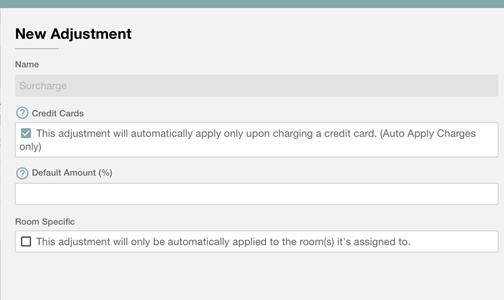
Can Now Define Adjustments as Surcharges
You can now define adjustments as surcharges for credit card purchases. We have added the Credit Card check box to the Add Adjustments screen. You can use this setting to define adjustments as surcharges for credit card purchases.
To access the control, click Account Menu in the Main Menu, then click Adjustments. In the Adjustments screen, click New. In the New Adjustment panel, we have added the Credit Card check box. (“This adjustment will automatically apply only upon charging a credit card.”) When creating a new adjustment, if you select this check box, the program will automatically enter “Surcharge” in the Name box and hide most of the other controls in the panel. You can then enter the amount of the surcharge (as a percentage) in the Default Amount (%) box. You can only enter an amount of 4% or lower. (The program will not save the adjustment with a default amount higher than 4%.) You can also select the Room Specific check box, if you want the surcharge to only apply to purchases made in the room it’s applied to.
New Location for Ignore Minimum Choices in POS Option for Modifiers
We have moved the Ignore Minimum Choices in POS option for modifiers in accounts that support multiple locations.
If you only support a single location in your account, you can find the Ignore Minimum Choices in POS option in the Accounts Modifier screen. Click Account Menu in the Main Menu, then click Modifiers. In the Modifiers screen, click New. In the New Modifier panel, you can access the Ignore Minimum Choices in POS check box. If you select this check box, the POS will ignore the set maximum number of modifiers for items ordered in-house.
Now, if you support multiple locations in your account, the Ignore Minimum Choices in POS option is in a different location. Click Menu in the Main Menu, then click Modifiers. In the Modifiers screen, click New. In the New Modifier panel, you can access the Ignore Minimum Choices in POS check box. This new location enables you to set the option separately for each location.
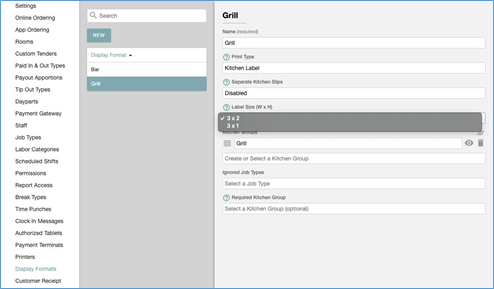
Label Size List Added to Display Formats Window
We have added the Label Size list to the Display Formats window. If you are defining a format for printing labels, you can use the Label Size list to set an appropriate size for your labels. In the Main Menu, click Location Setup, then click Display Formats. In the Display Format screen, click an existing record, or click New. In the settings window, if you select Kitchen Table in the Print Type list, the program displays the Label Size list.
In the Label Size list, you can select 3 x 2 or 3 x 1. The 3 x 1 option is the default setting. The 3 x 1 option is designed for labels printed by Epson L90 printers, and it only prints small fonts, up to 47 characters wide. At this time, you cannot edit the font or text size for either option.
If you change the width setting of a printer, you will also need to recalibrate the printer itself.
- Turn off the printer.
- With the roll paper cover open, turn on the power while pressing FEED inside the printer. Keep pressing FEED until the ERROR LED comes on.
- When the ERROR LED comes on, then release FEED.
- Press FEED six times.
- Close the roll paper cover.
The printer feeds several labels and remembers the label paper size.
Activation Emails No Longer Blocked for Gmail Users
We have removed the activation link from the New Users window. In some previous versions, when you created a new user (in the New User screen) and saved the new user record, the program would have displayed an activation link and URL, as well as sending an activation email to the new user. In earlier versions, users with Gmail accounts would not always receive their activation emails. Therefore, we added the activation link to the New User screen to provide an alternate source for the link. With this release, we have corrected the problem that blocked Gmail users from receiving their activation emails. Now when you save a new user record, the program sends an email to the new user that includes the activation link, but it no longer displays the activation link and URL.
Perform a Menu Import for Live Sites
You can now perform a menu import for a site, even if the site is live. In previous versions, the program would not allow you to perform a menu import unless the site was non-live. We have modified the program to allow you to perform a menu import, whether the site is live or not live, in order to help you set up menu data for a new site.
To perform a menu import, access the Tools screen. In the Main Menu, click Tools. Then, in the Import/Export Options area, select the Items check box, clear all other check boxes, then click Export Data.
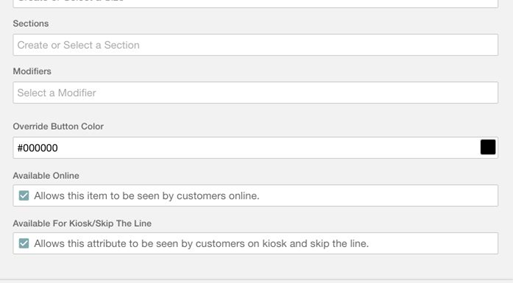
Available For Kiosk/Skip the Line Option Added to Setup Screens
We have added the Available For Kiosk/Skip The Line check box to the setup screens for the following records: Items, Sections, Groups, Sizes, Attributes, Modifiers, Ingredients, Context Items, Pricing, and Promotions. If you select this check box in a new record for any of these items, the item will be visible to customers using the Kiosk or Skip the Line service. When you create a new item, the program will select this check box by default. You can clear the check box to render the record unavailable in Kiosk or Skip the Line.
All PDF Documents Default to Landscape Format
When the program creates any output in PDF format (such as a report), the PDF document will display in landscape mode by default.
Overtime Rate Required for New Staff Records
When creating a new staff record in the Staff screen, the program now requires you to enter a value in the Overtime Rate box. In previous versions, the program required you to enter a value for Regular Rate and would set the Overtime Rate to “0” by default. The program now will not save the record until you enter values for both the Regular Rate and Overtime Rate. (If needed, you can still enter an overtime rate of “0”, but the program no longer applies that value by default.) This should reduce possible errors when exporting data to the Heartland Payroll Connector.
Hex or Color Chooser on Item Buttons
We have added a hex color code field/pop-up color picker for setting the colors of the buttons for menu items, modifiers, and tags.
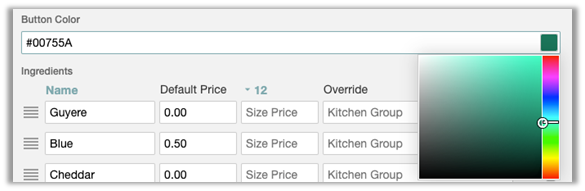
When setting the button color of a new or existing menu item, modifier, and tag, you can now enter a hexadecimal color code. This control is available in the Button Color areas of the New Menu Item, New Modifier, and New Tag windows.
Cycle Rewards for Loyalty Point Auto-Reset
We have added the Cycle Rewards check box to the Loyalty Setup screen. To access, in the Main Menu click Loyalty Setup, then click Loyalty.
If you select the Cycle Rewards check box, the POS will reset customers back to the Bronze Reward level from Gold Reward level after the Gold Reward is earned. Example, if a customer collects 30 points, the program will set the customer's rank to Gold, and the customer would than start accumulating points towards the Bronze Reward again.
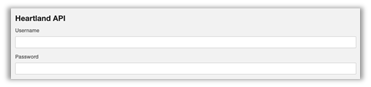
Expose Heartland Payroll to MobileBytes Accounts
Dealers with MobileBytes accounts can now access the settings for Heartland Payroll integration. In the Locations Settings screen, the Heartland API area and its controls are now visible and accessible to users with MobileBytes accounts, allowing you to enter credentials to access the Heartland API service.
Tax-Exempt Ticket Reporting
We have modified the Daily Summary Report to include tax exempt items and their reasons. In the Daily Summary Report, we have added a line item for “Tax Exempt Tickets”.
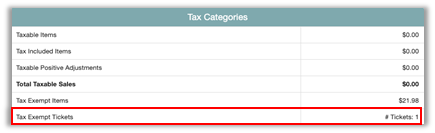
If you click this line item, the program will display all the tax exempt tickets in the report.

For each tax exempt ticket, the program will also display the reason entered by the staff member when applying the No Tax adjustment to the check.
New 2 x 1 Option Added to Printer Label Size List
In the Display Formats window, you can now set the POS to print for kitchen labels sized 2" x 1". In the Main Menu, click Location Setup, then click Display Formats. In the Display Formats screen, click an existing record, or click New. In the settings window, if you select Kitchen Label in the Print Type list, the program displays the Label Size list. In the Label Size list, you can now select 2 x 1.

Add First Data Processor for Monetary on Payment Gateway
The First Data processing option for Monetary is now accessible via the Payment Gateway screen in the Admin Portal. To access the In-Store Settings area, click Location Setup in the Main Menu, then click Payment Gateway. In the In-Store Settings area, in the Gateway list, select Monetary. The program will display the Monetary Credit Card Boarding form. In the Processor list, you can now select First Data. Once selected, you can enter necessary information to configure First Data as the Credit Card processor.

Kiosk
The following release notes detail any enhancements we have made to the Kiosk program for this release.
Kiosk Supports Additional Payment Methods
In the Kiosk, if a customer tries to pay a check with a gift card that does not have enough funds, the program will allow the guest to use an additional payment method to pay the remainder of the check's balance.
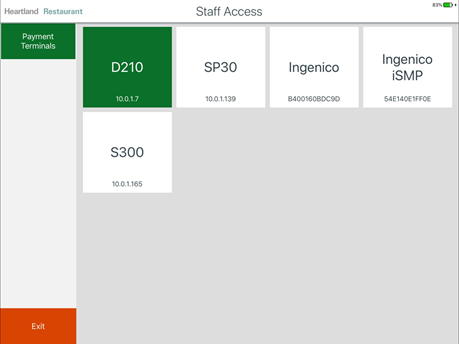
Kiosk Now Supports EMV Transports
The Kiosk can now process credit card payments with EMV transport types. When a customer pays a check, the Kiosk will display two pay options, Credit and Gift. After selecting an option, the Kiosk prompts the customer to finish the payment on the EMV terminal.
To enable or disable the EMV feature on the Kiosk, tap Heartland Restaurant in the top left hand corner of the screen. In the Heartland Restaurant window, tap Staff Access. In the keypad, enter a valid password. The Kiosk displays the Staff Access screen, which displays a list of buttons representing payment terminals. Tap a button to select the payment terminal that you want to pair with the Kiosk.
Guest
The following release notes detail any enhancements we have made to the Guest program for this release.
Improved Modifier Display Behavior
We have improved Guest App’s behavior for items with modifiers. In some instances, modifiers would not display unless you scrolled, which confused users since it appeared there were no modifiers available. With this release, the Guest App displays the list of modifiers immediately under the Menu Item without requiring the user to scroll down to find the top of the modifier list.
Recent Updates
The following list summarizes the updates we have included since our last Milestone release.
- The KDS no longer stops working in busy high traffic conditions.
- If you move an open check to a room with an automatic adjustment charge, the POS now applies the charge and recalculates the check's total appropriately.
- The Loyalty Report and the POS app now display accurate totals for loyalty rewards and points.
- The D210 payment device now accesses and displays split checks properly.
- The Admin Console now calculates totals accurately in the Server Checkout Report.
- Transaction data is no longer cached in the browser.
- The program no longer includes unadjusted checks in the Adjustments report.
- When configuring the program to use the Monetary transport type for a new location, you can now save your settings without first selecting the eCommerce or TranCloud check boxes.
- When you change from one group to another, the Online Ordering app will now only remove items from the cart if the items are unavailable in the new group or section.
- The program now displays the gateway options properly in the Payment Gateway screen.
- When you select an order type and enter a phone number, the other contact settings now become active and usable.
- If you filter the Tip Outs Report by staff and review a staff member's log, the program no longer generates an error.
- The POS now rounds the totals of split checks to the nearest full cent, allowing servers to pay and close split checks.
- The POS now only displays the Room Charge customer tender if you enable PMS integration for the site.
- The POS no longer voids all split checks when you use the Void Split
- The POS no longer displays the Email Receipt box in the Signature screen when you select the Email Receipts check box.
- The POS no longer misreports the totals of checks with "0.00" priced items.
- If the POS logs out while you are accessing an open check, the POS will now unlock the check when it logs out.
- The POS now deducts the amount of refunds from PMS accounts properly.
- If you run a report after the site's End of Day time, the program now only shows sales from the current day.
- The POS will not allow you to delete items and charges that have been paid for.
- We have removed the Auth/Capture transaction method for the PAX solution.
What’s Coming Next?
The following enhancements are planned and being prepared for future releases. We do not guarantee the completion of the issues included in this list, due to unforeseen circumstances that may arise during development. Please refer to the release notes to confirm the issues that have been completed.
- We will add support for the PAX SAF transport type.
- We will add an automatic default URL setting for the Central API configuration.