Overview
This article describes enhancements and updates to the following components:
- POS
- Admin Console
- GuestApp
- Kiosk
- Online Ordering
Enhancements
HR-192 POS Can Now Read Barcodes Embedded with Weight or Price Data
We have added settings for configuring the POS to read barcodes with embedded weight and price codes. Embedded barcodes are coded numbers that combine a product’s SKU number with its price or weight, often separated with a special character.

To access these settings, in the Main Menu, click Location Setup, then click Settings. In the Advanced Settings area, we have added the controls needed to configure the POS to read barcodes featuring embedded weight or price amounts. In the Embedded Barcode Type list, select the type of embedded barcode that the POS will read. If you want the POS to read barcodes that include an embedded weight amount, select Weight. If you want the POS to read barcodes that include an embedded price amount, select Price. If you do not want the POS to read either type of embedded codes, select None. If you select Price or Weight in the Embedded Barcode Type list, the program will display additional controls for configuring barcodes.

In the Barcode's Start Digit/Prefix box, enter the appropriate start digit/prefix.
In the Barcode's Max SKU Length box, enter the maximum number of digits of the SKU part of the embedded barcode. The price or weight amount will be combined with the SKU part.
Select the Barcode has Verification Digit check box if the barcodes will include a verification digit, a single digit or character separating the SKU from the weight or price.
In the Barcode's Max Price Length box, enter the maximum number of digits of the price amount in the barcode. In the Barcode's Max Weight Length box, enter the maximum number of digits of the weight amount of the barcode.
In the Barcode's Number of Decimals in Price box, enter the maximum of decimals that the program will use for the price amount. In the Barcode's Number of Decimals in Weight box, enter the maximum of decimals that the program will use for the weight amount.
Select the Barcode Has Check Digit check box if the barcodes include a single digit or character at the end of the price or weight component.
HR-202 Alphabetical Sorting of Item Lists for Sections, Groups, and Modifiers
We have added controls for alphabetical sorting to the item lists in the Sections, Groups, and Modifiers screens. To access these screens, click Account Menu in the Main Menu, then click Sections, Groups, or Modifiers.
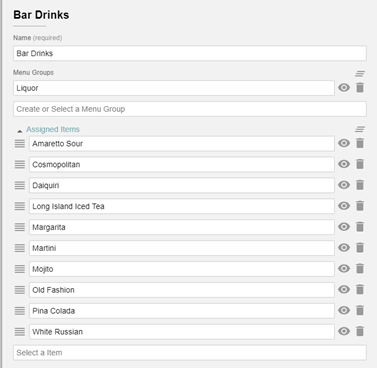
In the Sections screen, click New. The program opens the New Menu Section window, with controls to create a new section. This window includes the Assigned Items list, which enables you to assign multiple menu items to the menu section. After assigning multiple items to the list, you can sort the items manually. Now, if you click the Assigned Items label, the program will sort all items in alphabetical order. If you click the Assigned Items label again, the program will sort the items in reverse alphabetical order.
We have added a similar control to the New Menu Group window, which includes the Assigned Sections list. If you click the Assigned Sections label, the program will sort all sections in alphabetical order. If you click the label again, the program will sort the sections in reverse alphabetical order.
We have also added a similar control to the New Modifier window, which includes the Ingredients list. If you click the Ingredients label, the program will sort all items in alphabetical order. If you click the label again, the program will sort the items in reverse alphabetical order.
HR-211 Privacy Policy Updated
We have updated our Privacy Policy. To review, access the Admin Console. Click the Profile icon, then click My Profile. In the My Profile screen, click View Privacy Policy.
HR-277 Printer Controls Added to Scheduled Shifts Screen
In the Scheduled Shifts screen, we have added controls for printing. To access the Scheduled Shifts screen, click Location Setup in the Main Menu, then click Scheduled Shifts. In the Scheduled Shifts screen, click Create a Shift. In the Shift Settings screen, we have added the Print button. If you click the Print button, the program will open a print preview screen allowing you to preview and print the selected shift. This screen includes settings for the destination of the printed document, the number of pages, and printer layout.
This feature allows you to print shift data for whatever you add to the screen, such as shifts for specific persons or job types, with specified date ranges.
HR-287 Email Marketing Integration
You can now configure Heartland Restaurant to use the Email Marketing service. For a detailed description of how to set up Heartland Restaurant to use Email Marketing, please review our article on "Email Marketing Setup for Heartland Restaurant".
HR-294 POS Holds Tokens in Online Orders
For those processing Online Order payments through Heartland, when an order comes in from Online Ordering, the POS now holds the token so the server can void it or ring additional items and recharge the token without needing the card present. This function, formerly supported by Monetary, is now also supported by Heartland.
HR-320 New Cutting Modes Added for L90 Label Printers
We have added the Mode list to the New Printer window. To access the New Printer screen, click Location Setup in the Main Menu, then click Printers. In the Printers, screen, click New. In the New Printer screen, if you select Epson in the Brand list, then select L90 (Label) in the Series list, the program will display the Mode list. In the Mode list, you can select the cutting mode of an Epson L90 label printer. If you select Cut, the printer will automatically cut each label after printing. If you select Tear or Peel, the printer will not automatically cut labels after printing, allowing servers to remove and peel the labels manually.
HR-366 Color Options Restored to Menu Item, Modifier, and Tag Screens
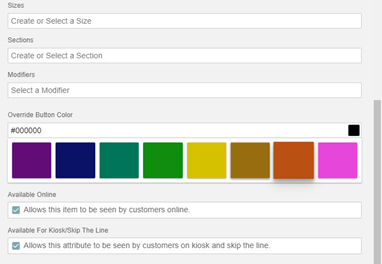
In a previous version, when you accessed the New Menu Item window, the Override Button Color box was available, enabling you to enter the HEX code for a desired button color. However, the default color options were removed. In this release, we have restored the default color options, and they are now available along with the Override Button Color box. If you click a default color option, the program will display the item's button in the POS with the selected color as a background. It will also insert the selected color's HEX code in the Override Button Color box.
We have also restored the default color options to the New Modifier window (below the Button Color box) and the New Tag window (below the Tag Color box).
Updates
HR-84 Email Receipt Box Now Hidden in Signature Screen
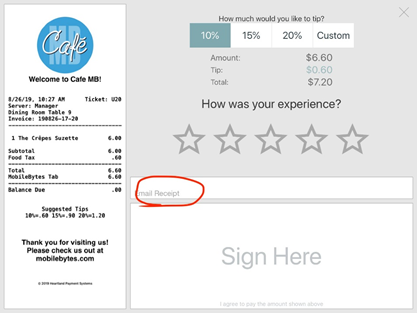
In previous versions, if you set the POS to hide the Email Receipt box in the Signature screen, the POS may have displayed it anyway. In the Location Settings screen, in the Transaction Settings area, you can set the POS to hide the Email Receipt box by clearing the Email Receipts check box. However, in previous versions, the POS may have displayed the Email Receipt box in the Signature screen, even if it was set to hide it. We have corrected this, and the POS no longer displays the Email Receipt box in the Signature screen when you select the Email Receipts check box.
HR-305 POS Reports Negative Adjustments Properly
In previous versions, if you performed a negative adjustment (such as applying a discount) to a check that included one or more items with a price of "$0.00", the POS may have misreported the check’s sales. We have corrected this, and the POS no longer misreports the totals of checks with "0.00" priced items.
HR-318 POS Now Unlocks Check Access When Automatically Logging Out
In previous versions, on sites that have set the POS to automatically log out after a set period of time, you may have accessed an open check and then allowed the POS to automatically log out. In such cases, if you logged back in and then tried to access the check, the POS may have locked the check and prevented you from accessing it. Normally, if the POS logs out while you are accessing an open check, the POS should unlock the check. We have corrected this, and if the POS logs out while you are accessing an open check, the POS will now unlock the check when it logs out.
HR-329 POS Deducts Refunds to PMS Accounts Properly
In previous versions, if you performed a refund to a PMS account, the POS may have added, rather than subtracted, the refund amount from the account's total. We have corrected this, and the POS now deducts the amount of refunds from PMS accounts properly.
HR-355 End of Day Reports Only Include Sales for Current Day
If you run a report after the site's End of Day time, the program now only shows sales from the current day.
HR-374 You Can No Longer Delete “Paid For” Items and Charges
In previous versions, the POS may have allowed you to delete "paid for" items and charges after closing out a PAX preauthorized transaction. Now, the POS will not allow you to delete items and charges that have been paid for. Only unpaid items (that is, items rung up after payment) can be deleted.
HR-420 Auth/Capture Method Removed from PAX Solution
In previous versions, during the automatic batch close process, the program may have removed any uncaptured authorizations from the PAX terminal, which would prevent you from adding tip captures to those transactions. To correct this, we have removed the Auth/Capture transaction method for the PAX solution. To access these settings in the Admin Console, click Location Setup in the Main Menu, then click Payment Gateway. When you select PAX in the EMV Solution list, you can no longer select Auth/Capture in the Transaction Method list. Only the Sale/Adjust method is now available for PAX.