Overview
This article describes enhancements and updates to the following components:
- POS
- Kiosk
- Admin Console
- Guest
Enhancements
The following release notes detail the enhancements we have included in this release.
HR-200 Upload Multiple Images
In the Image Library screen, you can now select and upload multiple images at a time. In the Admin Console's main menu, click Image Library. In the Image Library screen, in any of the tabs, you can upload images by clicking Upload, browsing to the appropriate directory, and selecting the file of the image you want to upload, then clicking Open. Now, you can select more than one image before clicking Open*.
HR-436 Configurable Upsell Prompt in Kiosk, Guest, and Online Ordering
You can now define upsell profiles in the Admin Console for the Online Ordering, Kiosk, and Guest. Upsell profiles enable the apps to display suggestive selling prompts to customers. For example, a customer might order a burger and a side order (fries), but no beverage. When the customer tries to pay that check, the app can “read” that order and recommend options to the customer (“Do you want a drink with your order?”) By defining an upsell profile, you can set the conditions that trigger an upsell prompt at the app, as well as the text of the prompt.
We have added the Upsell Profiles screen to the Admin Console. In the Admin Console's main menu, click Account Menu, then click Upsell Profiles. In the Upsell Profiles screen, click Create an Upsell Profile. The program will open the New Upsell Profile window.
In the Name box, enter a descriptive name for the profile. In the Message Prompt box, type the text of the message that the app will display when the upsell prompt is triggered.
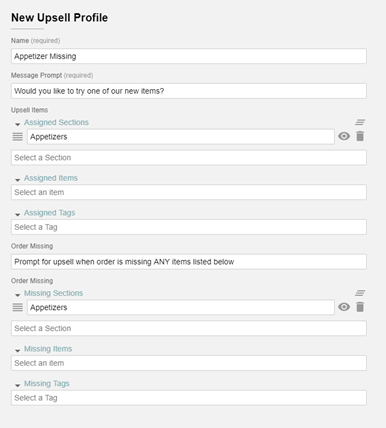
The Upsell Items area includes multiple lists, enabling you to select the items or groups of items that the POS will display as upsell options when the upsell prompt is triggered.
In the Assigned Sections area, you can select one or more applicable menu sections. If you select a section in the Assigned Sections list, the program will display another Assigned Sections list.
In the Assigned Items area, you can select one or more applicable menu items. If you select a section in the Assigned Items list, the program will display another Assigned Items list.
In the Assigned Tags area, you can select one or more applicable menu tags. If you select a section in the Assigned Tags list, the program will display another Assigned Tags list.
In the Order Missing list, you can set the condition that will trigger the prompt. If you want the POS to display the prompt when the check is missing any one of multiple specified items, select Prompt for upsell when order is missing ANY items listed below. If you want the app to display the prompt when the check is missing all items in a group of specified items, select Prompt for upsell when order is missing ALL items listed below.
The Order Missing area includes multiple lists, enabling you to select the items that, if missing from a check, will trigger the prompt.
In the Missing Sections area, you can select one or more applicable menu sections. If you select a section in the Missing Sections list, the program will display another Missing Sections list. If the check lacks any items from these sections (and other qualifying items, if any), the app will display the upsell prompt.
In the Missing Items area, you can select one or more applicable menu items. If you select a section in the Missing Items list, the program will display another Missing Items list. If the check lacks any of these items (and other qualifying items, if any), the app will display the upsell prompt.
In the Missing Tags area, you can select one or more applicable menu tags. If you select a section in the Missing Tags list, the program will display another Missing Tags list. If the check lacks any items associated with these tags (and other qualifying items, if any), the app will display the upsell prompt.
When you have defined all of your upsell profiles, you can add them to one or more upsell groups. To enable you to do this, we have also added the Upsell Groups screen to the Admin Console. In the main menu, click Account Menu, then click Upsell Groups. In the Upsell Profiles screen, click Create an Upsell Group. The program will open the New Upsell Group window.

In the Name box, enter a descriptive name for the upsell group. In the Prompt Mode box, select the desired prompt mode. The prompt mode determines if the app prompts for one or all of the valid profiles in the group. If you select Prompt First, the app will display a prompt for the first valid profile in the group's profile list. If you select No, it will not prompt for any other profiles.
If you select Prompt Until Yes, the app will display a prompt for the first valid profile in the group's profile list. If you select No, it will display the next prompt. If you select Yes, it will display the item or section, enabling the customer to make a selection. When you return to the checkout screen, it will not display prompt again.
If you select No Prompt, the app will not display a prompt for any of the profiles in the group.
In the Assigned Profiles area, you can select one or more upsell profiles to include in the group. If you select a profile in the Assigned Profiles list, the program will display another Assigned Profiles list. If you add multiple profiles to a group, the app will apply all of the profiles in the group based on your prompt mode, starting with the first group in the list. (The app will prioritize the profiles based on their order in the list.)
After you define one or more upsell groups, you can associate them with the Online Ordering service, Kiosk app, or Guest app. In the main menu, click Location Setting, then click Online Ordering, then click the Online Ordering tab. In the Schedules area, under both Carryout and Delivery, if you add a shift to the Menu & Hours list, that shift now includes an Upsell Group list. In that list, you can select one of the upsell groups you've created in the Upsell Groups screen. If you select an upsell group, then save you settings, the Carryout and Delivery service will display upsell prompts according to the settings of the profiles within the selected group.
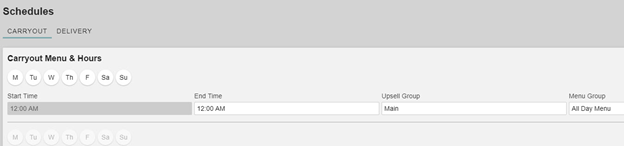
You can also select an upsell group for the Kiosk and Guest (Skip the Line) apps. In the main menu, click Location Setup, then click App Ordering, then click the General tab. In the Menu & Hours list, we have also added the Upsell Group list to each shift. If you select an upsell group, then save you settings, the Kiosk will display upsell prompts according to the settings of the profiles within the selected group.
HR-437 Real-time KDS Order Display
You can now set the POS to send new items to the KDS screen immediately when they are ordered. In the Admin Console's main menu, click Location Setup, then click Display Formats. In the Display Format settings window, we have added the Delayed and Real-time options to the On the Fly KDS list. This list enables you to set the POS to send orders to the KDS screen, and when they are sent. If you select Disabled, the POS will not send order information to the KDS until you tap Send. If you select Delayed, the POS will send a new item to the KDS only after you order another item or tap Send. If you select Real-time, the POS will send a new item to the KDS as soon as you add it to a check.
HR-439 Designate Ingredients as Out of Stock in the POS
You can now designate an ingredient as “out of stock” at the POS without rendering its main items unavailable. In the POS, if you tap and hold an ingredient button, the app will display a small panel, displaying the Out of Stock button. If you tap “Out of Stock”, the POS will display “0” on the ingredient’s button and not allow servers to add that ingredient to a main item. However, the POS will allow servers to order main items that are set to include that ingredient.
HR-611 Multiple Limit Ranges to Future Orders in the KDS
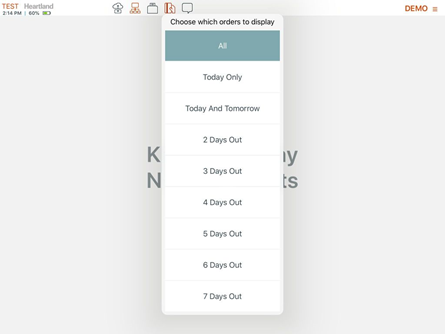
In the POS, you can now set different limits to the range of future orders displayed in the KDS. In the POS, running in KDS mode, tap the menu icon (top right corner), then tap Show Future Orders. The app now displays a list of buttons, each representing a time range spanning from the current day to a day in the future, such as Today Only, Today and Tomorrow, 2 Days Out, and so on. If you tap one of these time range buttons, the KDS will only display future orders that are set to be prepared within the selected time range.
HR-617 Customizable Table Prefix on Checks from Kiosks
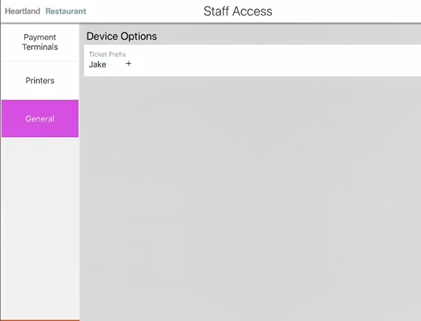
In previous versions, customers could order at the table kiosks, but there was no way to identify which kiosk an order was coming from. The kiosks now have a unique identifier, so when customers order at a table kiosk, the ticket will include a prefix that enables kitchen staff to identify where the order should be sent.
There’s a new kiosk menu option accessible under Staff Access > General tab > Ticket Prefix. Selecting Ticket Prefix allows the manager to update the Ticket Prefix text, using a four-character (maximum limit) name to distinguish the customer’s table location.
HR-716 Support for Restaurant Systems Pro
Heartland Restaurant now supports the Restaurant Systems Pro, an online restaurant management software that help sites manage labor costs, food costs, and other expenses with various reporting features and other services.
Before configuring a site to use the Restaurant Systems Pro (RSP) service, you must set up an account for the site and receive an API key. Once you have an API key, log into the Admin Console. In the main menu, click Accounts and then select an appropriate account.
Then, in the main menu, click Integrations. In the Integrations screen, click New Integration. In the Integrations Setup panel, select API in the Integration Type list, then select Restaurant Systems Pro in the Integration Partner list. Then click Save. No further setup is needed within Heartland Restaurant.
Restaurant Systems Pro offers software to control the Prime Cost number for the restaurant with the various reporting tools below:
- End of Day - Cash controls for your restaurant by pulling the Sales, Accounts Payable and payment methods for the End of Day Report.
- Clock In and Out times to track actual Labor numbers using their Reverse Labor System.
- Product Mix pull that will allow you to create a Menu Profit Generator Report which will calculate ideal Food Costs.
These are very important systems that help control merchants Prime Cost that is calculated from Labor numbers and COGS. With the Heartland Integration merchants can obtain this information with a click of a button.
Updates
The following release notes detail the updates we have included in this release.
HR-60 Rotating Images in the Image Library
In previous versions, when you added an image in the Image Library, the Admin Console may have not allowed you to rotate the image to the right. Repeated attempts to rotate the image would have resulted in the link breaking, and the image disappearing. We have corrected this, and you can now rotate and save images correctly in the Image Library.
HR-304 Prep Tickets with Special Items with Apostrophes Print Properly
Star Impact printers will now print prep tickets that include special items with apostrophes in their descriptions. In previous versions, if your site uses Star Impact printers, you may have failed to print the names of special items with apostrophes in their names. If you added a special item to a check, and the special items description included an apostrophe ('), the printer may have failed to print properly. In some cases, the printer may have printed the ticket but excluded the name of the item with the apostrophe. In other cases, the printer have failed to print the ticket at all and then stopped printing anything from that POS workstation. (In such cases, you would have been forced to shut down and restart the POS app. We have corrected this, and Star Impact printers will now print prep tickets that include special items with apostrophes in their descriptions.
HR-507 Tips & Payouts Report Displays Accurate Tip Out Totals
In previous versions, the Tips & Payouts Report may have displayed inaccurate totals for Tip Outs. Specifically, the Tips & Payouts Report may have included an unnamed row with a Tip Outs amount equaling the total of all other tip outs in the report. The program would then add this amount to the report's total, effectively doubling the accurate amount of tip outs. We have corrected this, and the Tips & Payouts Report now displays accurate totals for Tip Outs and no longer displays the unnamed row. (While this report may have displayed inaccurate totals, the Tip Out Report did display accurate totals for Tip Outs.)
HR-626 PAX/Portico Handles Duplicate Transactions Properly
In previous versions, if your site uses the Portico Direct transport, you may have encountered a problem. In certain circumstances, if you verified the same card for the same amount more than once on a single ticket, it was possible for follow-up transactions to be falsely recognized as duplicates by the PAX terminal. We have corrected this, and PAX terminals now reads transactions properly when you run the same card for the same amount on a single check.
HR-628 POS No Longer Rolls Up Non-duplicate Items with Duplicate Toppings
The POS no longer rolls up non-duplicate items with duplicate toppings. In previous versions, if you set a display format or a customer receipt to roll up duplicate items, the POS may have rolled up non-duplicate items with duplicate toppings. In the Customer Receipt settings window, you can set the POS to roll up duplicate items in printed customer receipts by selecting the Roll Up Duplicates check box. In the Display Formats settings window, you can set the POS to roll up duplicate items in other printed documents by selecting one of the enabling options in the Duplicate Item Rollup list. However, if you did this, the POS may have rolled up a whole item with a part of an item if they both had the same topping. For instance, if you ordered a whole pizza with pepperoni and half of a second pizza with pepperoni, the POS may have “rolled up” those items. We have corrected this, and the POS no longer rolls up non-duplicate items with duplicate toppings.
HR-633 Tippable Feature Correctly for Discounts
In previous versions, the POS may have ignored the Tippable setting for discounts. In the Discounts settings screen, you can set the POS to include a discount's modification to a check's total when calculating auto-gratuities. You can do this by selecting the Tippable check box. However, in previous versions, if you defined a discount and cleared the Tippable check box, the POS may have included the discount when modifying the automatic tip amount. In other words, the POS would treat the discount as “tippable”, even if you set it not to. We have corrected this, and now if you define a discount and clear the Tippable check box, the POS will ignore the discount when calculating auto-gratuities.
HR-648 “Pay Cashier” Credit Card Payments Accepted for Carryout Orders
In previous versions, if you set Online Ordering to accept only credit card payments for carryout orders, the Kiosk may not have allowed you to pay the check in person to a cashier. In the Admin Console, you can set the Kiosk to provide customers a “Pay Cashier” payment option. In the Admin Console's main menu, click Location Setup, then click App Ordering. In the App Ordering screen, click the KIOSK tab. If you select the Allow Pay in Person check box, the Kiosk app will give the customer the option to take a copy of the check to a cashier and pay the check in person.
In the Admin Console, you can also set the Online Ordering service to require only credit card payments for carryout orders. In the Admin Console's main menu, click Location Setup, then click Online Ordering. In the Online Ordering screen, click the ONLINE ORDERING tab. In the Carryout Settings area, if you enable carryout service, then select the Credit Card payment type in the Carryout Payment Types list. However, if you set the app to require credit card payments for carryout orders, the Kiosk may have generated an error when a customer tapped the Pay Cashier button (“Order Failed. Pay in person is not allowed for carryout orders”). We have corrected this, and the Kiosk no longer generates an error when a customer uses the Pay Cashier payment option.
HR-652 Server Bank Screen Displays Unmasked Amounts
When you access the Server Bank screen, the POS displays unmasked amounts for “Cash Transactions” and “Expected Cash in Drawer”. In previous versions, if you accessed the Server Bank option, the POS may have failed to display the amounts for cash transactions and expected cash. In the POS, you can access the Server Bank option tapping the Menu icon (upper right corner), then tapping Server Bank. In previous versions, the POS may have displayed masked amounts (“X.XX”) for “Cash Transactions” and “Expected Cash in Drawer”. We have corrected this, and now when you access the Server Bank screen, the POS displays unmasked amounts for “Cash Transactions” and “Expected Cash in Drawer”.
HR-663 Fast Cash Adds Only One Cash Payment to a Check
The Fast Cash option now adds only one cash payment to a check. In previous versions, if you used the Fast Cash option, the POS may have added more than one cash payment to the check. For instance, if you select the Fast Cash option, the POS may have added four cash payments to the check. We have corrected this, and the Fast Cash option now adds only one cash payment to a check.
HR-669 No Error When Adding Adjustments with Percentage Values to a Check
The POS no longer generates an error when you add an adjustment with a percentage value to a check. In previous versions, if you tried to add an adjustment with a percentage value to a check, the POS may have generated an error (“Unable to add adjustment”). In such cases, the POS may have rounded adjustment amounts improperly and generated the error. We have corrected the app's rounding method, so the POS no longer generates an error when you add an adjustment with a percentage value to a check.
HR-688 Guest App Doesn’t Crash When You Enter User Information
In previous versions, when a guest’s name, email, and birthday were entered on the Guest App and submitted, the app may have quit abruptly. We have corrected this issue.
HR-699 Duplicate ingredients counts not showing on ingredient buttons
In previous versions, when you ordered an item three items, the button was no longer displaying “item name (3)” due to the change of adding ingredient short names. The POS is now correctly capturing the entry so the Ingredient button displays the item name and the number of times added. For example, “Ranch (2)”.