Overview
This User Guide provides information on the features available within the Heartland Mobile
Manager mobile app.
User Agreement
When you open the mobile app for the first time, the User agreement is displayed.
Please read the user agreement and then select “I agree to the Terms and Conditions” to accept the agreement and use the mobile app.
App Sign In
To sign in to the mobile app:
- Type your email address and password in the provided fields.
>If you forget your password, simply select Forgot
Your Password? and you will receive an email with
password reset instructions.
>If you want the mobile app to remember the
credentials you provided, select Remember Me and
you will be automatically signed in each time you
launch the app.
- Select Sign In.
To enable Alerts on your device, select Allow when prompted.
Upon initial sign-in, the mobile app will notify you that the default landing page is the
Key Stats page. Select OK to dismiss this message. You can change the default page at a later time.
Navigation
Mobile App Pop-Up Menu
You can navigate the Mobile App using the hamburger icon in the upper left corner. This opens
the sidebar menu pictured below, which contains shortcuts to each page of the app. This pop-up
menu can be accessed from any screen of the mobile app.Functions / Pages.
Explanation of Functions
The following section briefly introduces the functions included in the Mobile Manager app. We will cover
these in more detail later in the sections that follow.
>Key Stats: Access the Key Stats feature to view real-time statistics about store performance, such as daily sales summary, receipt totals, and average check amount.
>Notifications: Access the Notifications feature to view store events flagged for attention.
>Reports: View mobile app reports about specific store data for a selected date.
>Manager Logbook: Create,view, and edit Manager Logbook entries.
>Help:
>Settings: View and modify your account settings.
>Logout: Sign out of the mobile app.

Key Stats
The Key Stats feature provides real-time statistics of various areas of store performance, such as receipt totals, number of voids, and average check amount.
You can compare Key Stat values from different points in time, such as today compared to yesterday, to calculate the difference. You can also "drill-down" into each Key Stat to view a more detailed breakdown of its data.
By default, the Key Stats page will display seven (7) metrics. You can add, edit, and delete these to your liking.
Key Stat Comparisons
The Look At and Compared With fields, located directly beneath the main Key Stat
Comparison heading, indicate how the Key Stat values are compared.
In the example above, the Look At field is set to "Yesterday" and the Compared With field is
set to "This week to date". This means that for each Key Stat displayed, yesterday's value is
being compared to the total value for the week to date.
Sales Total Key Stat
The Sales Total Key Stat is always displayed at the top of the Key Stat list.
Select the right arrow displayed next to the Key Stat name to view a more detailed breakdown of
its data. See the Key Stat Drill Down section below for more details.
For each Key Stat comparison, the Look At value is displayed first with the Compared With
value displayed below.
- The Look At value is colored orange when it is less than the Compare With value.
- The Look At value is colored green when it is greater than or equal to the Compare
With value.
In the example above, the sales total for yesterday is less than the sales total for the week to date.
The arrow displayed below each Key Stat comparison indicates whether the Look At value is higher  or lower
  than the Compared With value. Displayed next to the arrow is the monetary difference (or difference in quantity, depending on the Key Stat) between the compared values. This difference is also represented as a percentage.
The Sales Total Key Stat also includes a graphical representation of the Key Stat comparison values.
Key Stat Drill Down
To see a more detailed breakdown of data:
- Select the right arrow next to the Key Stat name to open the main page of the Key Stat.
The main page of the Sales Total Key Stat provides the following information:
>Sales total comparison for all locations
>A graph that compares the sales total by hour for both comparison values
>Location-specific information including:
Sales total comparison o Total number of checks o Average check amount
Total sales for each store department - Select the right arrow at the end of a store department row to drill down into its total sales.
The second page of the Sales Total Key Stat provides the following information:
>Department sales broken down by item category
>Number of units sold
>Average check amount - Select the right arrow at the end of an item category row to drill down into its total sales. o
The third page of the Sales Total Key Stat provides the following information:
>Item category sales broken down by item
>Number of units sold
>Average check amount - Select the right arrow at the end of an item row to drill down into the check details.
The fourth page of the Sales Total Key Stat provides the following information about each
related check: - Check #
>Check total
>Cashier name
>Time when check was processed - Select a check from the list to view all the check details.
The checks are listed in the order in which they were closed. - Select Share Check to share the check with another person.
Select Specific Store(s) to View
You can view Key Stat values for one or more specific stores or combined values for all your
stores.
The location you are currently viewing is specified in the main Key Stat Comparison heading.
By default, the Key Stats reflect the combined value for all your store locations.
To view the Key Stat values for one or more specific locations:
- Select the store filter
 icon in the top-right corner to open the Stores list.
>All stores assigned to you are listed. - Select the desired stores.
>When a store is selected, a check mark appears next to its name.
>To remove a store from the list, simply select the store again. - Once you have selected the desired stores, select the white checkmark in the top-right corner of the Select Stores list to return to the Key Stats home page.

Change Key Stat Comparison Values
The Look At and Compared With fields located directly beneath the main Key Stat Comparison heading indicate how the Key Stat values are compared.
You can change both field values to view and compare Key Stats from different days or ranges of time. When you change the Key Stat Comparison values, the listed Key Stat values are updated automatically.
To change the field values:
- Select the Look At heading, then select the desired value from the Date Selection
menu. See the Date Selection Menu section below for details. - Select the white checkmark in the top-right corner of the Date Selection menu to return
to the Key Stats home page -OR- select the “X” to abort your changes. - Select the Compared With heading, then select the desired value from the Date
Selection menu. - Select the white checkmark in the top-right corner of the Date Selection menu to return to the Key Stats home page -OR- select the X to abort your changes.
- Select the desired value from the Compare to drop-down menu.
The Original value you selected will be compared to the Compare to value
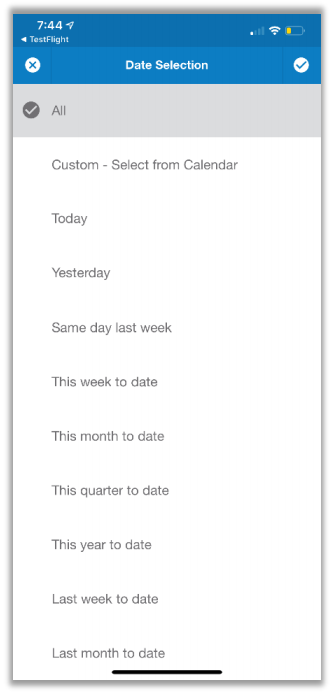
Date Selection Menu
The Date Selection menu provides a list of time period values that are available for selection.
Select the desired value to view Key Stat values for that time period.
To select a specific date or a range of dates, select Custom to select the date(s) from a calendar.
Refresh Key Stat Values
To refresh the Key Stat values to reflect real-time, use your finger to drag the screen downward and then release your finger.
You will see the message "Pull to refresh" beneath the Key Stat Comparison heading.
Add New Key Metric
You can create new key metrics in Key Stats directly in the Mobile Manager app. To do so,
follow these steps:
- From the Key Stats page, tap the blue button in the lower right corner of the screen.
- On the Customize Key Stats page, tap the + button at the top.
- On the Create key metric page, select Store if required (if multiple stores are assigned),
select desired Report Type from the list, assign a Name, and then select desired
Primary Value from the list. - Upon clicking the checkmark icon, the app will display a toast message indicating that
your key stat metric was created.
Delete Key Metric
Much like the process to create a key metric, you can now also delete key metrics via the Mobile Manager app. To do so, follow these steps:
- From the Key Stats page, select the edit icon at the bottom right. This opens the Key
Stats customization page. - Tap the red X button for the key metric you wish to delete.
- Answer the confirmation prompt.
- The app will display a toast message indicating that your key stat metric was deleted.

Notifications
The Notifications feature provides a list of alerts triggered by specific events or conditions
at your store that require your attention.
To view notifications, tap the hamburger icon in the upper left corner and then select Notifications
from the popup menu.
The Notifications screen lists triggered alerts requiring attention, as defined by notification
configuration, covered later in this guide.
- Use your finger to scroll through the list of notifications.
- To refresh the Notifications list to reflect real-time, use your finger to drag the screen downward and then release your finger.
- You will see the message "Pull to refresh" beneath the Notifications heading.
- Select the red x to dismiss a notification and remove it from the list.
Filter List by Notification Type
You can filter the list of alerts by their respective type. Only those alerts of the selected type(s) will be listed.
To filter notifications by type:
- Select Filter by Type located in the top- left corner of the Notifications screen.
- From the Select Notifications Type menu, select the desired type(s) .
- Select the white check mark in the top- right corner of the Select Notifications Type menu to view the notifications list.

Filter List by Date
You can filter the list of notifications by their respective date. Only those notifications that were generated on the selected date(s) will be listed.
To filter alerts by date:
- Select Filter by Date located in the top-right corner of the Alerts screen to open the Date Selection menu.
>The Date Selection menu provides a list of time period values that are available for selection. - Select the desired value to view alerts generated during that time period.
>To select a specific date or a range of dates, select Custom to select the date(s) from a calendar. - Select the white check mark in the top-right corner of the Date Selection menu to view the Alerts list.

Reports
The Reports feature provides access to generated reports of store data.
Reports can be accessed via either the icon on the Home page or selected from the sidebar
popup menu.
All of your reports are listed on the Reports main page.
- The report name, type, and the method used to group the data are specified for each report.
- To reorder the report list, touch the dotted icon located to the left of the report name and then drag the report to the desired position on the list.
- Select the right arrow next to the report you want to view.
The generated report presents the data in both graphical and table format.
The example to the right shows a Sale type report where the data is grouped by store. The report name is "JC Sales".
Note: Reports generated for your store locations may look slightly different from the example.
To quickly select a different report to view, select the downward arrow next to the report name, and then select the desired report from the drop-down list.
Select Specific Store(s) to View
You can view report data for one or more specific stores or combined values for all your stores.
The location you are currently viewing is specified in the main Reports heading. By default, the report data reflects the combined value for all your store locations.
To view the Report data for one or more specific locations:
- Select the store filter icon in the top-right corner to open the Stores list.
All stores assigned to you are listed.
- Select the desired stores.
>When a store is selected, a check mark appears next to its name.
>To remove a store from the list, simply select the store again. - Once you have selected the desired stores, select the white check mark in the top-right corner of the Select Stores list to return to the Reports home page.
Generate Report Data for a Different Date
To view report data for a different date or date range:
- Select the downward arrow on the Filter By Date field located beneath the Reports header
to open the Date Selection menu.
The Date Selection menu provides a list of time period values that are available for selection. - Select the desired value to view report data values for that time period.
To select a specific date or a range of dates, select Custom to select the date(s) from a
calendar. - Select the white check mark in the top-right corner of the Date Selection menu to generate
and view the report.
Manager Logbook
The Manager Logbook allows store owners and managers to easily communicate essential information related to their store’s operation by way of shared entries, designated as Notes or Tasks. It provides:
- A list of notes pertaining to the store’s operation. For example, perhaps bad weather adversely affected sales on a particular day.
Notes can be attached to reports. - A checklist of all tasks for the store’s operation, such as scheduled maintenance, cleaning, and organization tasks.
Tasks have assigned target completion dates and a checkbox to acknowledge completion.
All entries are updated and synchronized in real-time for all store managers, and on all devices.
The main page contains the following functionality:
- The Filter By Date drop-down allows you to filter by a specific date or date range.
- The Search box can be used to search for a specific task or note.
- The MOST RECENT header can be clicked to display the most recent entries.
- The MOST IMPORTANT header can be clicked to display items with highest priority first.
- The Unread and Read sections display items that are new or have been read by you.

To create a new entry, from the main page, tap the blue plus symbol on the bottom right.
The following Create Entry page displays: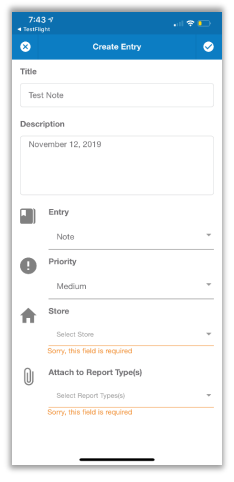
- Enter the name of the entry in the Title field and a description in the Description box.
- Click the Entry drop-down to indicate if this entry is a note or a task and, depending on your selection, proceed as follows.
Creating a Task
Use the drop-down arrows described here to customize the task:
- Type: Select to indicate if the task is Operational, Maintenance, Event, or Other.
- Target Date: Set a target date for the task to be completed.
- Priority: Select the priority of the task by choosing from Low, Medium, High, Critical.
- Store: When you have multiple stores you can indicate if the task is for a specific store.
- Notify When: By pushing the slider button to the right you can enable push notifications for events related to the task. Eligible events include when a task was Created, Read, Commented (on), Completed, and when it is One day before the target date.
- Who: Click to select specific stores owners for notifications. Alternately, you can push the slider button all the way to the right to notify all store owners.
Click the checkmark symbol in the top right to create the task.
Creating a Note
Use the drop-down arrows described here to customize the note:
- Priority: Select the priority of the task by choosing from Low, Medium, High, Critical.
- Store: When you have multiple stores you can indicate if the note pertains to a specific store.
- Attach to Report Type(s): Click to attach the note to specific report types (for example, CHARGE, SALES…). Atlernatly, you can attach a note to all report types by pushing the slider all the way to the right or by pushing the slider button to the right you can attach the note to all report types (i.e. the note you select will be attached to all the reports with the selected report type).
Click the checkmark symbol in the top right to create the task.
Icon Explanations
Manager Logbook uses the following helpful icons:
 The letter N in a circle indicates a Note.
 The letter T in a circle indicates a Task.
 The exclamation mark indicates the priority of the item. It is color coded to indicate different levels of priority.
 The paperclip indicates a Note is attached to a report.
 The paper copies icon indicates you can copy the details of an entry to create a new entry.
 Tasks have a checkbox so that you can indicate when a task is complete.
Setting Filters
- Tap the funnel
 icon in the top right corner to set a filter.
 - You can use the slider button to the right to filter a Note or Task by Status (Active or Completed), Priority (Low, Medium, High, Critical), Type (Operational, Maintenance, Event, Other, Stores, Target Date.
Help: Send Feedback
To use this feature, tap the Help option from the sidebar menu, and then select Send Feedback from the
Help page. Type your message into the provided text box, attach any images you wish to share, then tap
the checkmark icon in the upper right corner to submit your message. The app will display a toast message indicating that your feedback has been sent.

Settings
The Settings page displays your account information and allows you to customize various aspects of the
app to your liking.
- Account information: Allows you to view your information and change your password
- Default Page: Allows you to set your preferred default page
- Notifications settings: Allows you to enable and configure notification settings
- Version: Displays the installed version of the app
- Dark Theme: Allows you to enable/disable dark theme
Change Your Password
To change your password for the mobile app:
- Select your name from the Account home page.
- Select the Current password field.
- Using the keypad, type your current password in the Current password field.
- Select the New password field.
- Using the keypad, type your new password in the New password field.
- Select the Confirm new password field.
- Using the keypad, type your new password again in the Confirm new password field.
- Select Update.
Change Your Default Home Page
To change the default home page that opens when you login to the mobile app: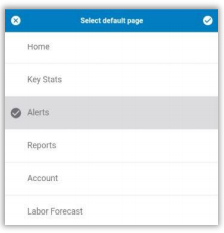
- Select Default Page from the Account page.
- Select the desired home page.
- Select the white checkmark in the top-right corner of the Select default page popup to return to the Account home page -OR- select the X to abort your changes.
Notifications
You can edit push notification settings directly via the mobile app, using the same rules as the Admin Console.
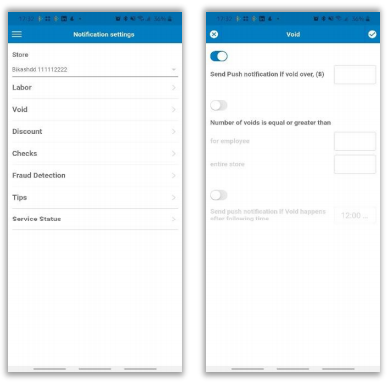
Once you have made changes and saved, you will receive a toast confirmation message. If you make changes and attempt to exit the page without saving, the program will notify you and give you the option to return to the page to save or Discard.