Overview
This article describes how to set up a site to use the Star TSP143III thermal printe. This printer defaults to Access Point (AP) Mode. You can set up the printer by using one of the following three methods:
- Using the WPS pairing buttons on the printer and your access point / router
- Installing the Star Quick Setup Utility App in iOS
- Connecting to the wireless access point via a browser on a PC, Mac, or iPad
We recommend using the WPS pairing option if your access point / router supports it. If your access point / router does not have this option, please use one of the other options.
Printing a Printer Status Page
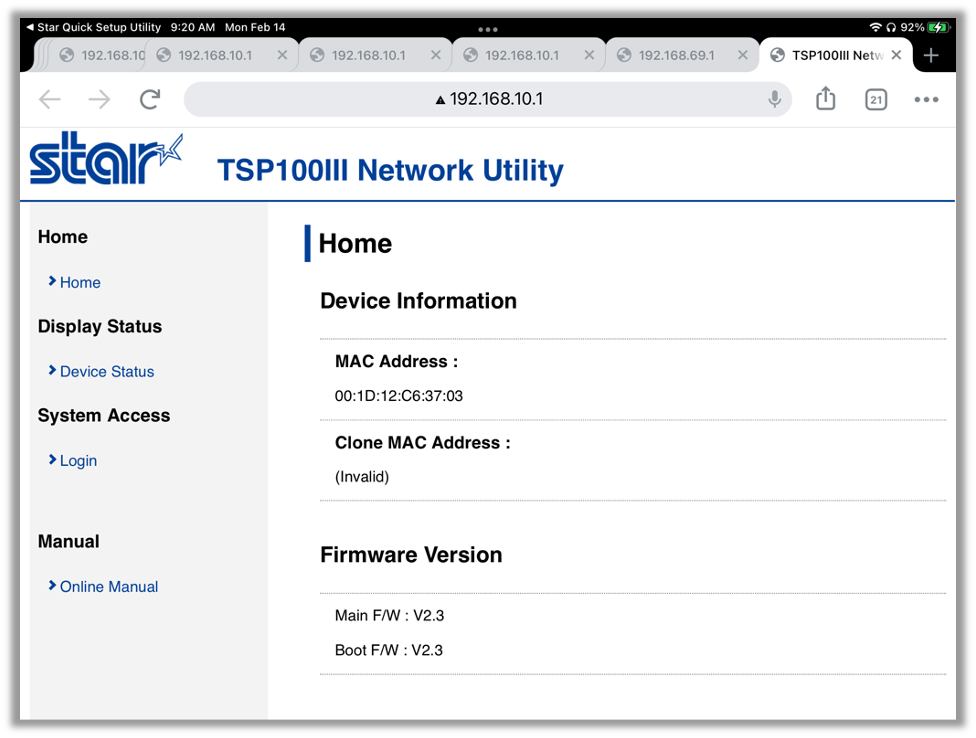
The Printer Status page provides important information such as current settings, IP address, and MAC address to properly identify and set up the printer. Once you have connected the printer to your network, you will need to record the IP address for use in the Guided Access setup process.
- Turn off the printer and make sure paper is loaded.
- Depress and hold the feed button while powering on the printer.
- Continue holding the feed button while the printer powers up. The power lights will illuminate, and the printer will initialize mechanically.
- Once the printer starts printing, release the feed button.
- The Printer Status page will print and will include the MAC address under the Network Configuration heading.
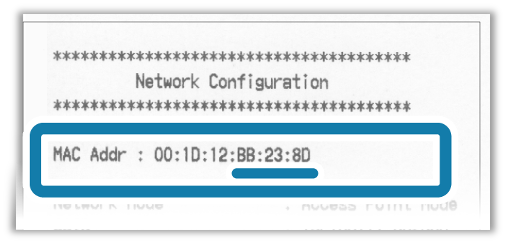
- Note: In the initial settings, the printer will start in AP mode. The SSID for AP mode is: "TSP100III-XXXXXX (XXXXXX is the last 6 digits of the MAC address)".
Connect to the Printer
Connect to the printer via ONE of the following three options.
Connect via WPS Pairing Button Using Your Router
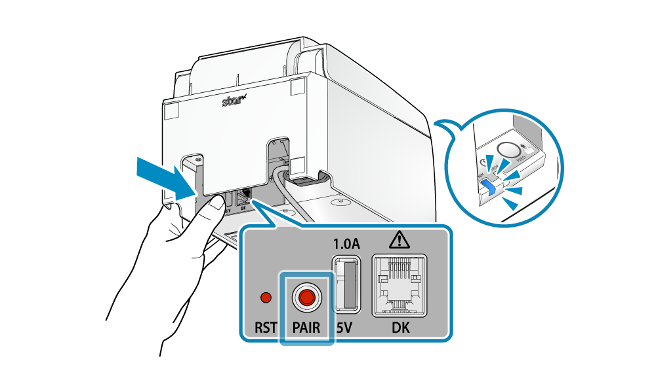
- Press and hold the PAIR button until the LED (blue) button of the printer blinks.
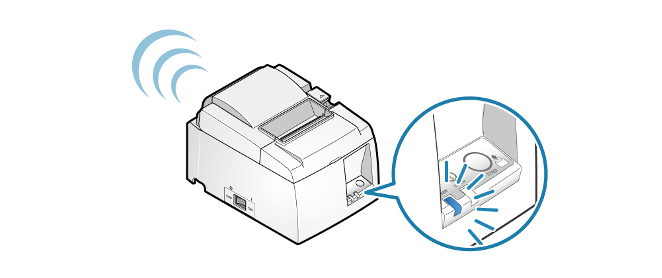
- Press the WPS button on the front of the access point / router.

- When a network connection is established, the printer will automatically print out the connection details, and its LED will stop blinking and stay on. Once you have the printout with the IP address, proceed to the next step.
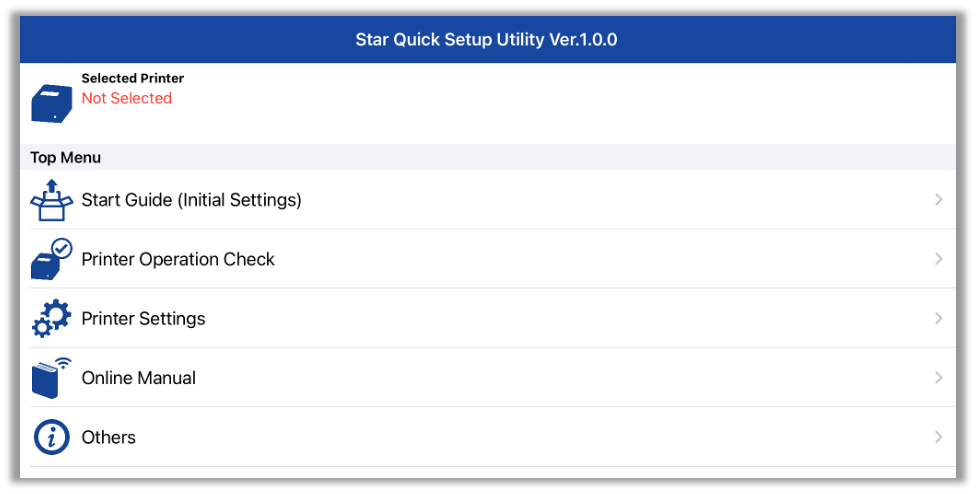
- Check and record the printer’s IP address via the Star Quick Setup Utility app.

- Open the app and select the Selected Printer Not Selected option at the top to search for the printer.
- If the printer is connected to your network, it will display there with its MAC address along with its updated IP address, appropriate to your network configuration.
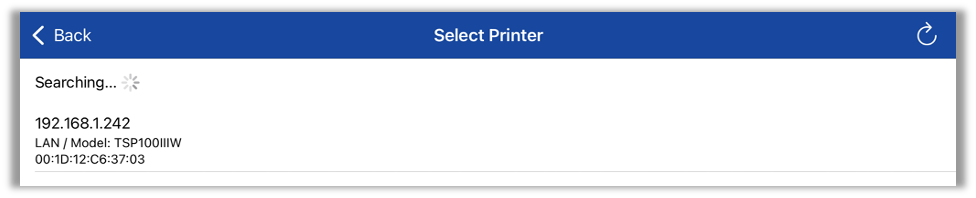
- Select the printer and record the IP address for later use in the in the Guided Access setup process.
If the printer fails to connect, repeat this process, beginning with step one. Alternately, you can connect the printer via one of the options in the following two sections:
Connect via AP Mode Using Star Quick Setup Utility
- If it’s not already installed, download the Star Quick Setup Utility app from the App Store.
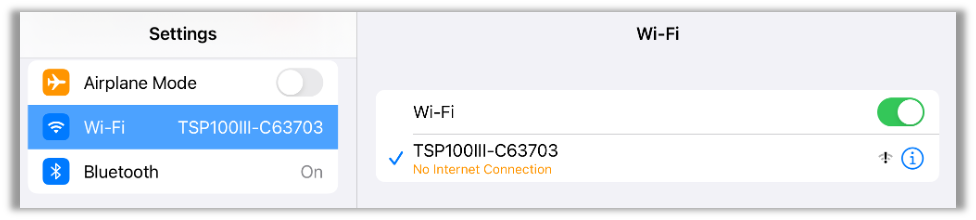
- Power on the printer. Navigate to Settings, then Wi-Fi, and connect to the Wireless Access Point named TSP100III- The last six digits will be the same as the last six digits of the printer’s MAC address, as reflected on the Printer Status page.
- Once you have connected to the printer’s Access Point, open the Star Quick Setup Utility app.
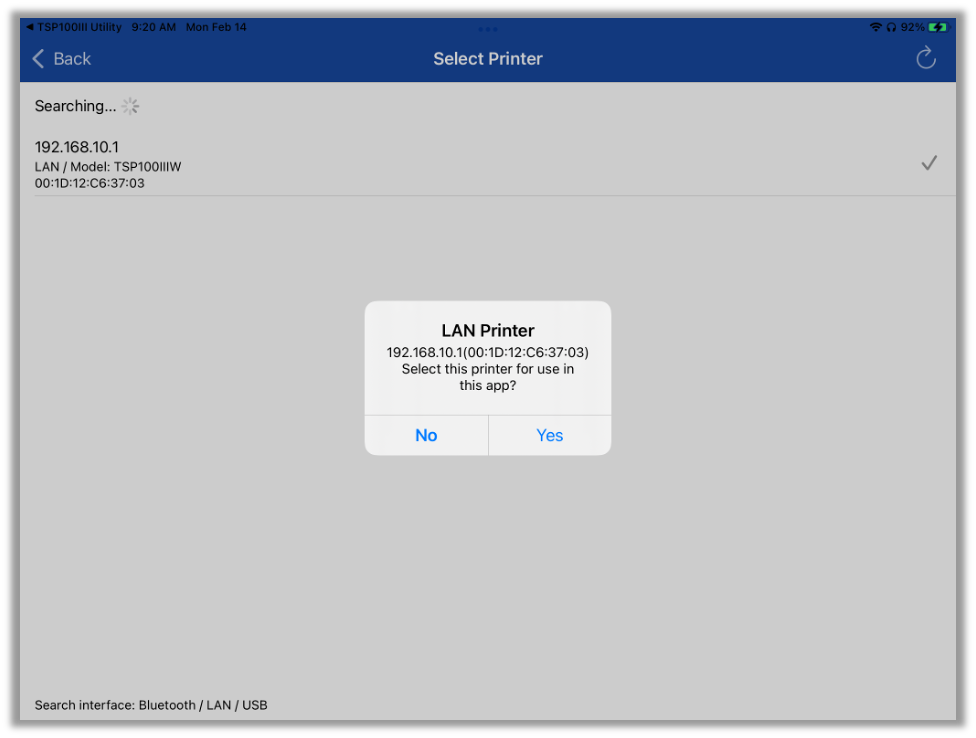
- Tap the Selected Printer Not Selected option at the top to search for the printer.
- Once the app finds and displays the printer, select it to confirm.
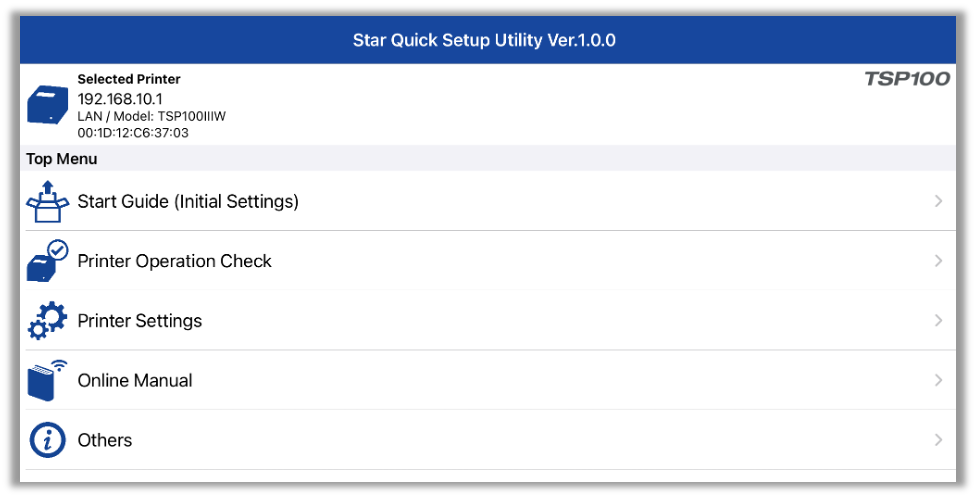
- Once you have selected the printer, go to Printer Settings.
- Select Network Settings.
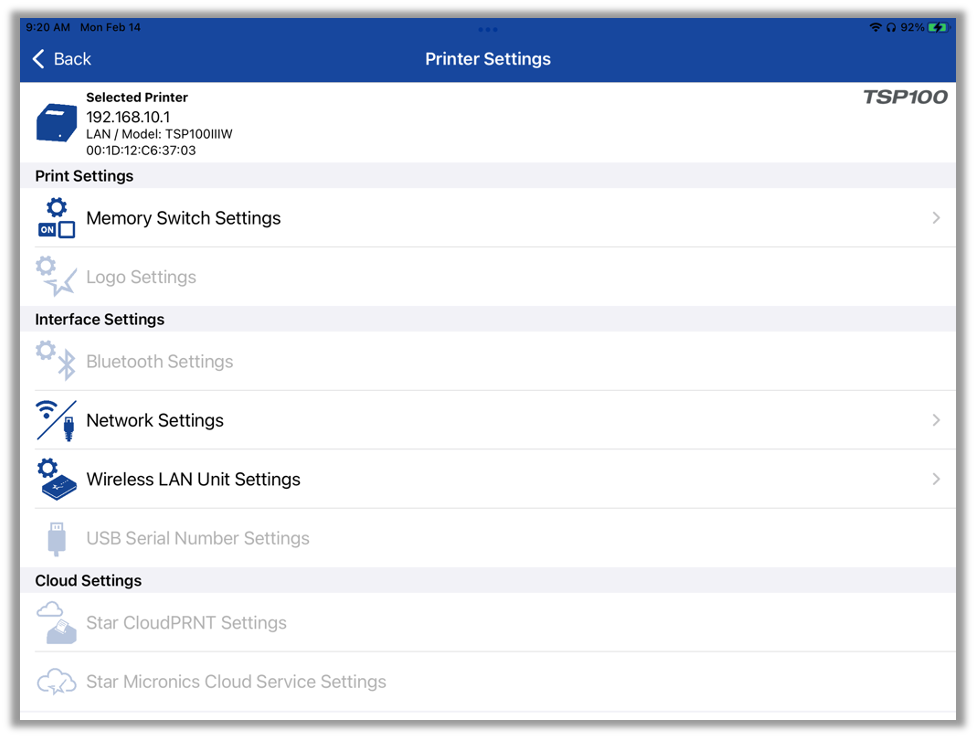
- This will automatically open a browser to access the printer’s settings. Select Login from the menu on the left.
- Enter the default login name and password as follows:
Username: root
Password: public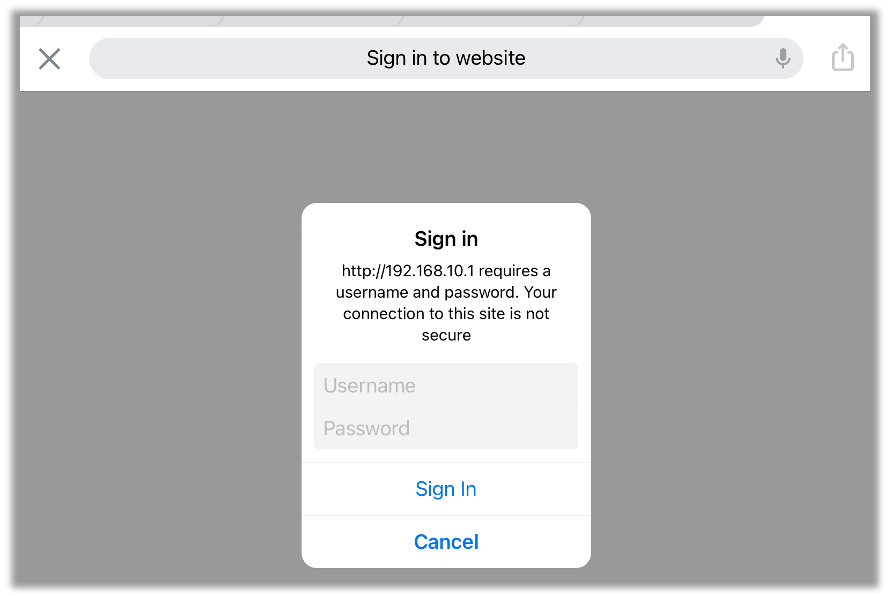
- You will receive a prompt to update the password for the printer.
Select Cancel to continue to login & finish setup of the printer.
Select OK if you would like to change the password.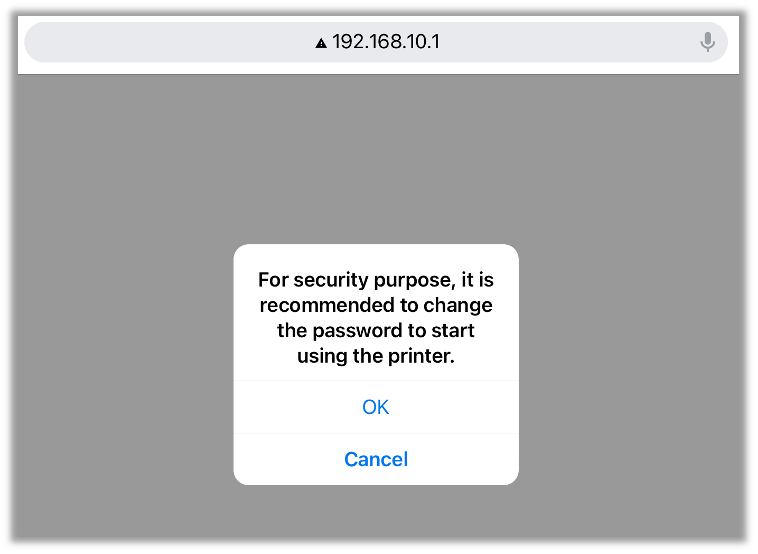
- Go to WLAN Settings on left-hand side. Change the Wireless LAN Settings from Access Point Mode to Infrastructure Mode.
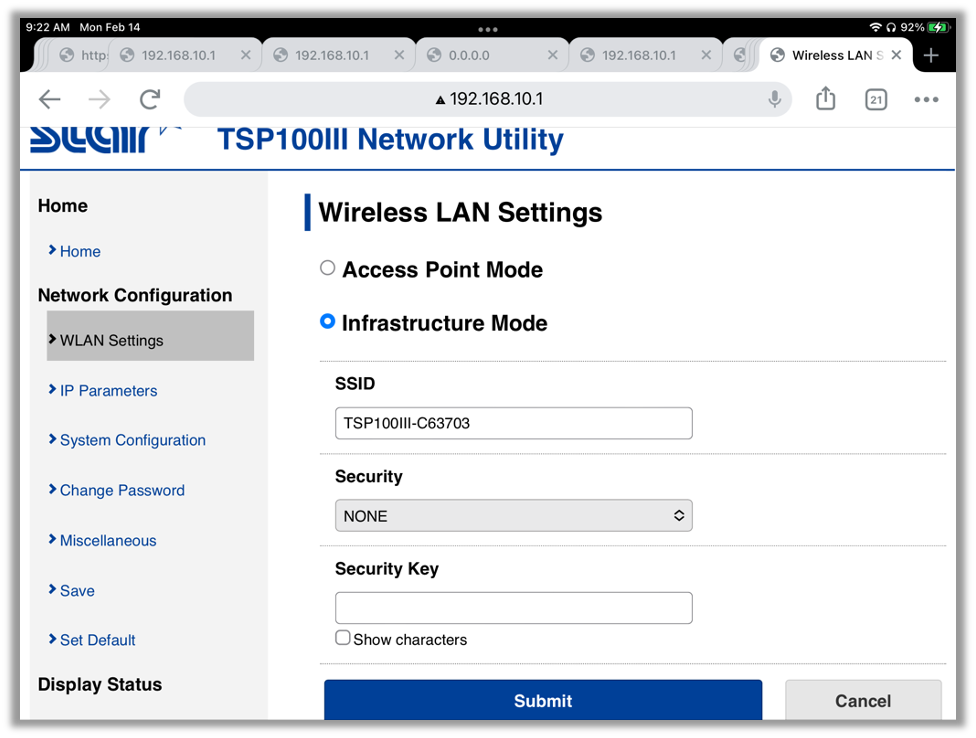
- Replace the default TSP-100 info in the SSID field with your SSID (your Wi-Fi network name). Select AUTO as the Security. Enter your Network Wi-Fi password for the Security Key and select Submit.
Note: Special characters such as apostrophes, quotations, etc. located in the SSID are not recommended, and may result in the failure to connect the Wi-Fi printer to the tablet. - Navigate to Save on the left-hand side, select Save -> Configuration printing -> Restart device, and then Execute.
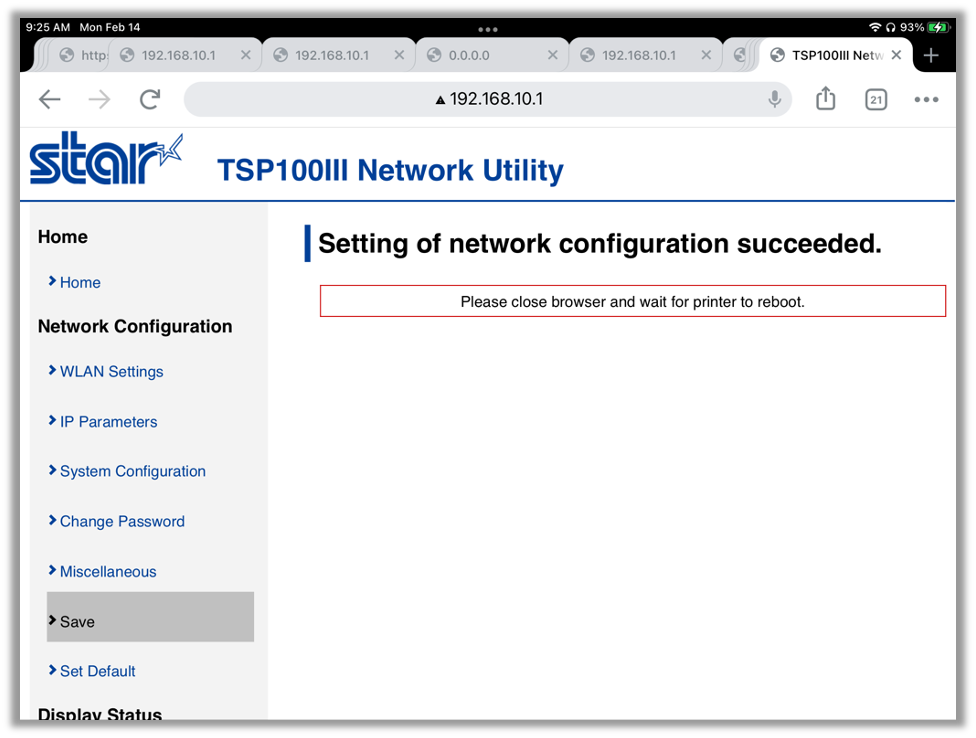
- You will get a message ‘Please close browser and wait for printer to reboot.’
- Wait for the printer to reboot and then open the Star Quick Setup Utility app. If the printer successfully connected to your network, it will display along with an updated IP address appropriate to your network settings. Record the IP address for use when setting up the Admin Portal and POS later in the process.
NOTE: The device will default to DHCP. If you require a static IP address, continue to the Set Static IP Address section.
If the printer is unable to connect to your network, please follow the steps in the Reset Network Settings to Factory Defaults section and then repeat the steps in this section. Alternately, you can use one of the other two connection methods described in this document:
Connect via AP Mode Using an Internet Browser
- To connect your tablet to the printer, first make sure the printer has paper and then turn it on.
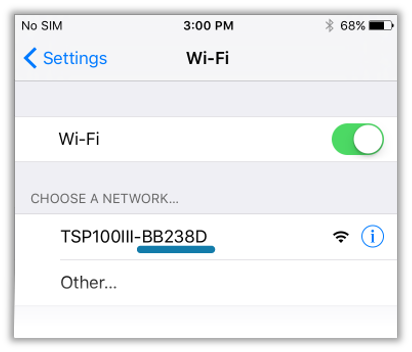
- Once the power light is solid, open the Settings screen of the tablet and select Wi-Fi to enable Wi-Fi.
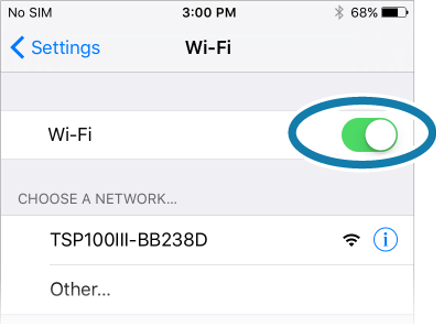
- From the device list that appears under Choose a network, refer to the last 6 digits of the MAC address confirmed in the previous section and select the device to connect.
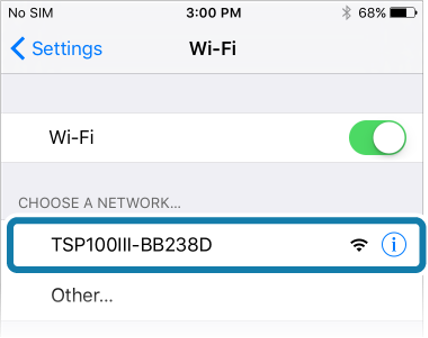
- When a connection is established, the SSID will appear under Wi-Fi with a check mark.

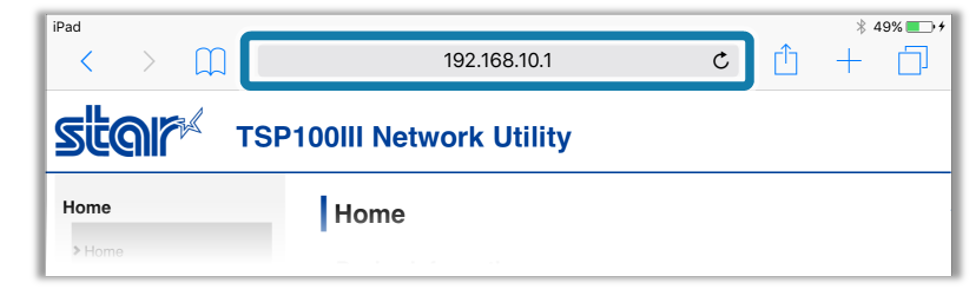
Note: When connecting with AP mode, Internet access is not available. - Open a browser (such as Safari), enter 168.10.1 in the address field, and press enter.
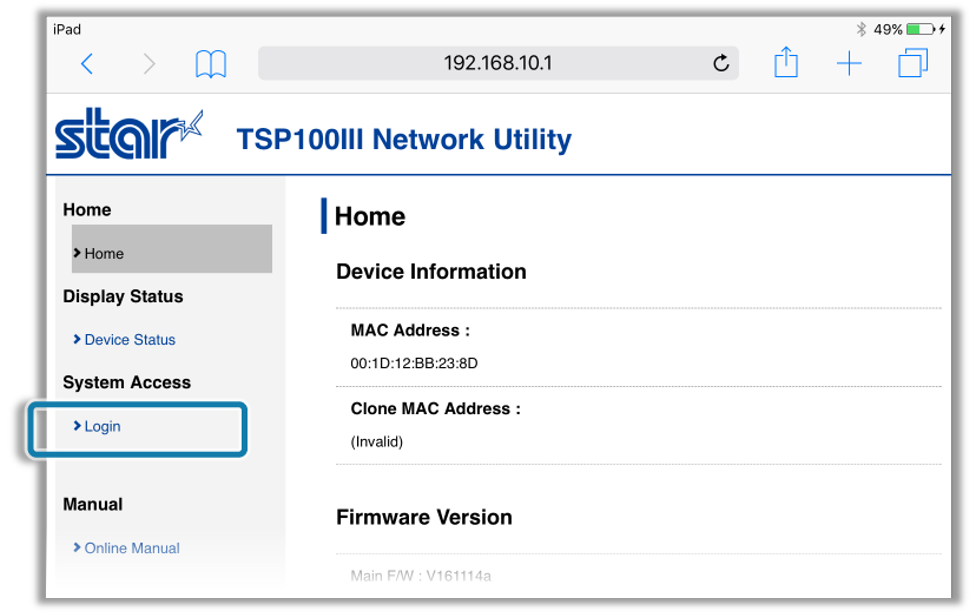
- Select Login from the menu displayed on the left side of the setting screen.
Alternately, select the menu button in the upper left corner and select Login.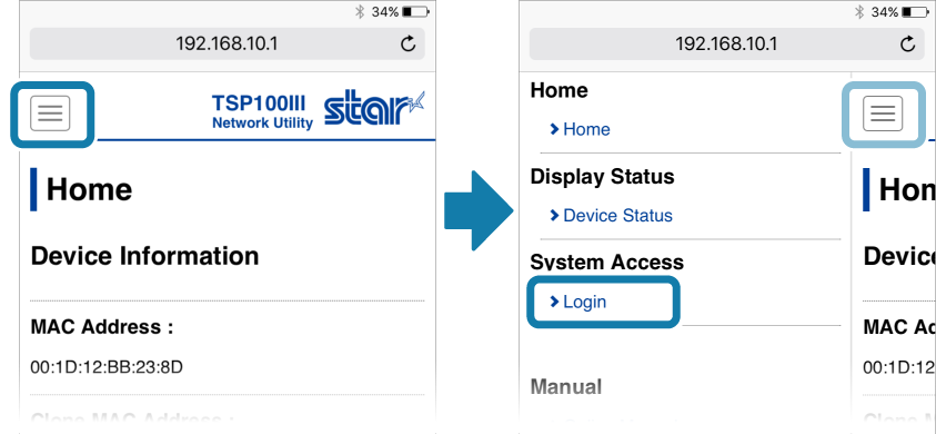
- When prompted, enter the following default login name and password and select Log In.
Login name: root
Password: public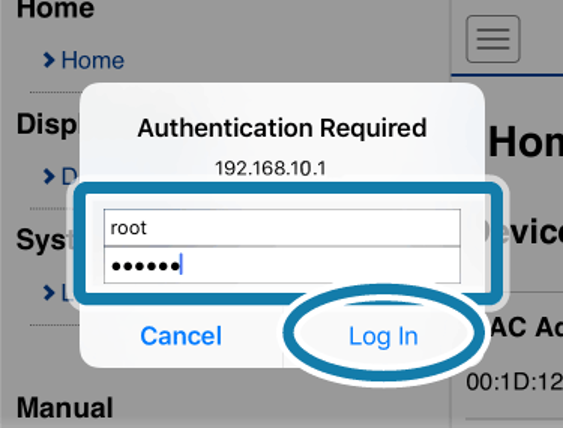
You will receive a prompt to update the password for the printer.
Select Cancel to continue to login & finish setup of the printer.
Select OK if you would like to change the password.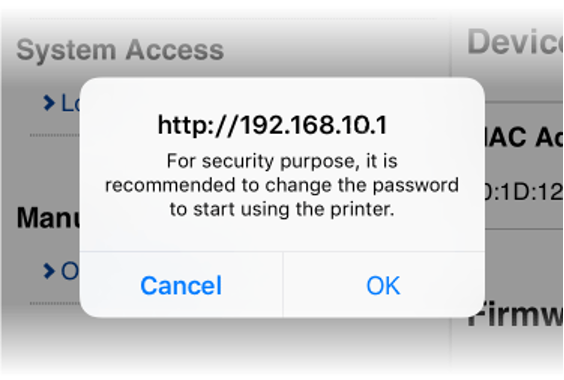 After changing the password, return to the following step.
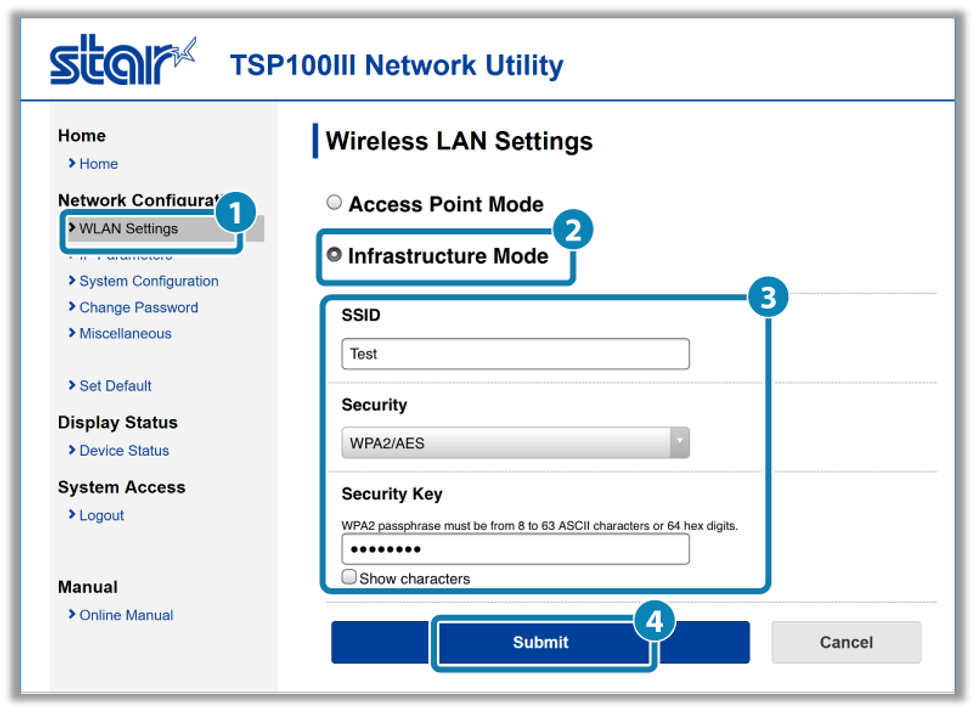
 - From the menu displayed in the left side of the settings, or via the menu button in the upper left, select WLAN Settings.
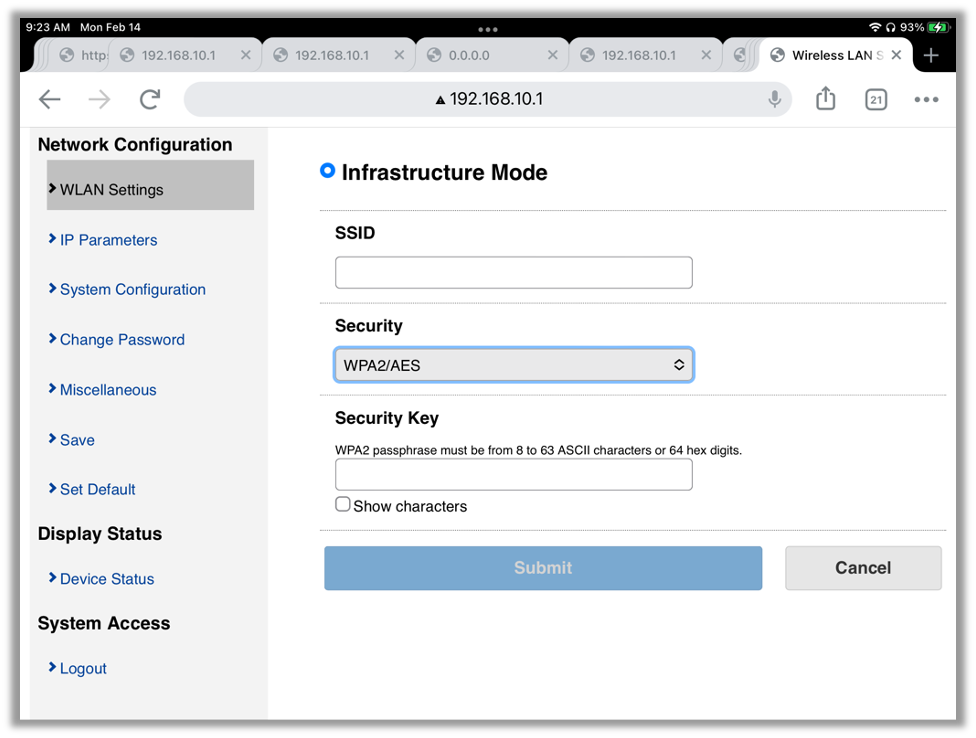
- Select Infrastructure Mode.
- Enter your SSID (your network name), Security, and Security Key (your network password) in the fields provided.
Note: Special characters such as apostrophes, quotations, etc. located in the SSID are not recommended, and may result in the failure to connect the Wi-Fi printer to the tablet. - Tap Submit.
 On the screen that appears, you can verify that the information entered is correct. If you need to make corrections, select Return to Previous page <WLAN Settings>. Once you have verified that settings are correct, select Save.
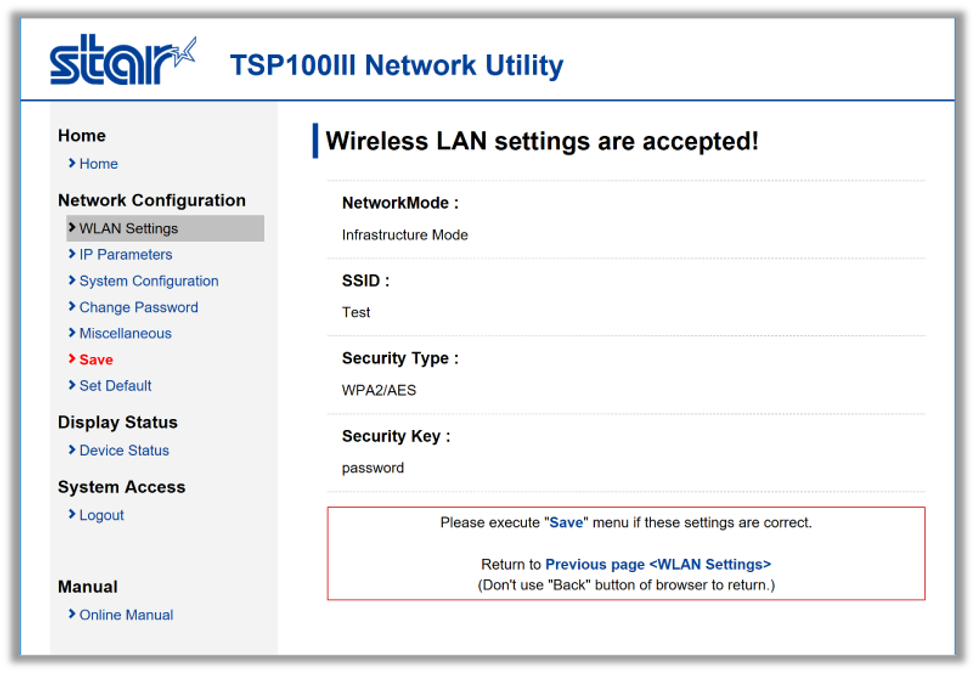
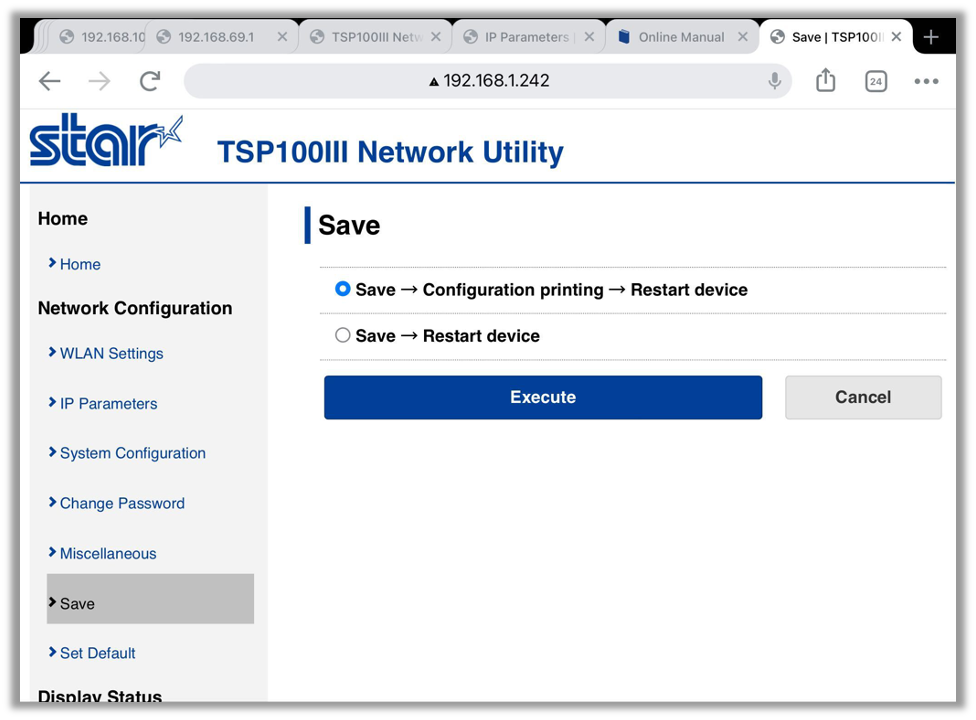
- From the Network Configurations on the left side of the screen, or via the menu button in the upper left, select Save.
- Select Save -> Configuration printing -> Restart device.
- Tap The settings are now saved to the printer and the IP address information will print out shortly.

- Record the IP address for later use in the in the Guided Access setup process.
NOTE: The device will default to DHCP. If you require a static IP address, continue to the Set Static IP Address section.
If the printer is unable to connect to your network, please follow the steps in the Reset Network Settings to Factory Defaults section and then repeat the steps in this section. Alternately, you can use one of the other two connection methods described in this document:
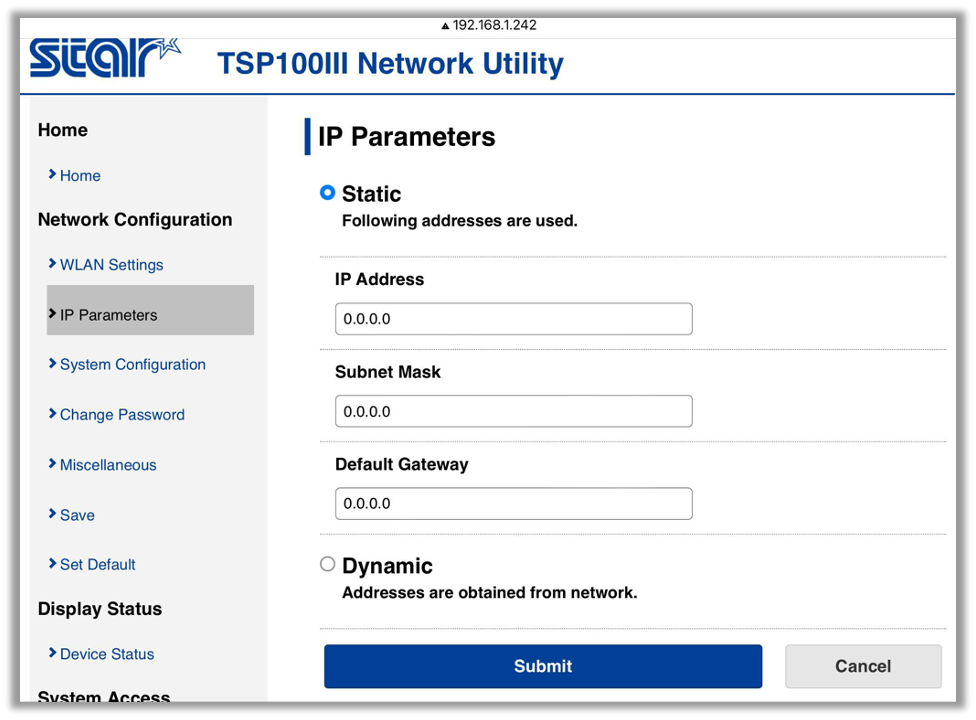
Set Static IP Address
If needed, you can set a static IP address to maintain a specific IP address for your printer.
- Connect to your printer via a browser and select IP Parameters from the menu on the left.
- Select Static and, in the fields provided, enter the desired IP Address along with your network’s required Subnet Mask and Default Gateway.
- Select Submit.
- Navigate to Save on the left-hand side, select Save -> Configuration printing -> Restart device, and then Execute as in previous sections. Wait for the printer to reboot and then confirm functionality.
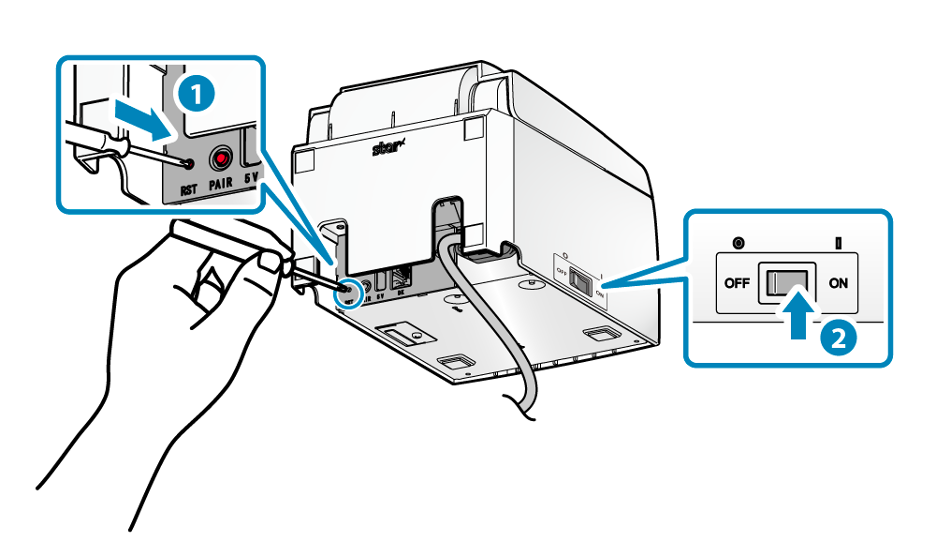
Reset Network Settings to Factory Defaults (AP Mode)
- Turn the printer off.
- On the back of the printer, using a small tool, press and hold the inset RST button while turning the printer on.
- Continue holding the RST button while the printer resets two times. The printer will make a mechanical sound as it initializes to indicate it has reset.