Overview
The hardware devices outlined in this article are supported in the following product tiers.
- Complete
This article describes how to configure Heartland Retail to use the PAX A35 device to process payments. The A35 terminal is an Android based, multilane transaction processing and mobile smart terminal. This service is only supported by Heartland Payment processing.

To function properly, the device must be loaded with a Special PAXStore template for Heartland Retail.
We recommend you make any adjustments to the device at the PAXStore level to ensure that, if the device’s firmware is ever updated or changed, those updates will include the site-specific settings. If you do not set them at the PAXStore level, your settings will be overwritten by any downloads.
Prerequisites
- You must add an A35 SKU to an opportunity in Salesforce.
- The merchant account must have a Heartland Processing MID in Salesforce to complete the order.
- The merchant must be processing with Heartland Payments Systems.
If you have any questions or concerns regarding the PAX device, please contact us via email at HPOSSIPSUPPORT@HEARTLAND.US, or call us at 1.888.909.8498.
Connecting the A35 Device

- Long thick cord. Plug this cord into the back of the PAX device.
- Short cord with Red Plug. If your site uses Ethernet, plug the Ethernet cord into this cord’s red plug. If your site uses W-Fi, you need not connect this cord.
- Long thin cord with VGA Plug type. Not used.
- Long thin cord with USB Plug type. Not used.
- Long thin cord with Electrical Plug. Plug this cord into the electrical outlet.
Connecting the A35 to Your Network
Wi-Fi Connection
Static Wi-Fi Configuration
- Turn on the device.
- In Home Screen, tap Settings.
- Enter the password (9876 or pax9876@@), then select OK.
- Tap Wi-Fi.
- If Wi-Fi isn't turned on, tap the radio button to enable it.
- Tap the network name you want to connect to. We recommend connecting to the same network as the POS.
- Enter the Password for the network.
- Once connected, tap on the network name.
- Tap the Pencil icon at the top right.
- Tap Advanced Options.
- Scroll down to IP settings.
- From the dropdown, select Static.
- Scroll down to IP address and enter the desired IP address.
- Enter the Gateway (Router) IP address.
- Enter DNS 1 as the Gateway (Router) IP address, or any DNS of your choosing.
- Tap Save.
DHCP Wi-Fi Configuration
- Turn on the device.
- In Home Screen, tap Settings.
- Enter the password (9876 or pax9876@@), then select OK.
- Tap Wi-Fi.
- If Wi-Fi isn't turned on, tap the radio button to enable it.
- Tap the network name.
- Tap the Pencil icon at the top right.
- Scroll down to IP Settings.
- Tap IP Settings and select DHCP from the dropdown.
- Tap Save.
Ethernet Connection
Static Ethernet Configuration
- Turn on the device.
- Connect the Ethernet cord to the red port.
- In the Home Screen, tap Settings.
- Enter the password (9876 of pax9876@@), then tap OK.
- Ensure that Ethernet is enabled or toggled on.
- Tap Ethernet.
- Tap Ethernet Configuration.
- Change the dropdown from DHCP to Static.
- Enter the desired IP address.
- Enter the Subnet mask of the network.
- Enter the Gateway (Router) IP address.
- Enter the DNS1 as the Gateway (Router) IP address or any DNS of your choosing.
- Tap Save.
DHCP Ethernet Configuration
- Turn on the device.
- Connect the Ethernet cord to the red port.
- In the Home Screen, tap Settings.
- Enter the password (9876 of pax9876@@), then tap OK.
- Ensure that Ethernet is enabled or toggled on.
- Tap Ethernet.
- Tap Ethernet Configuration.
- Change the dropdown from Static to DHCP.
- Tap Save.
Configuring the A35 in Heartland Retail
Make sure your device is plugged in to a power source and is connected to your store's network, either via Ethernet cable or W-Fi (depending on the device).
Activate Heartland Gateway
In order to start processing transactions with Heartland, you need to activate it in your account.
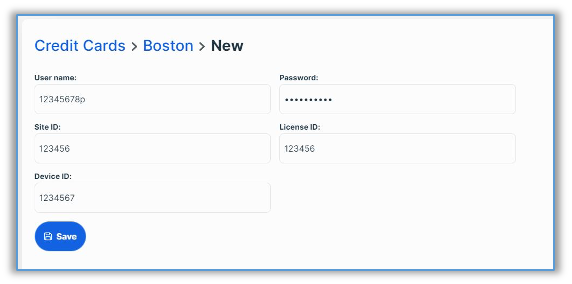
- Log in to your Heartland Retail account and go to Settings > Credit Cards > Location, selecting the location in which you are using your new device.
- Click the Add Gateway button.

- Click the Choose link under the Heartland logo.

- Next, fill in the information required on the form. This should have already been filled in by the dealer/reseller already, but can be acquired for the device via broadPOS or the PAXStore. Service URL: http://api2.heartlandportico.com
Sync your Device
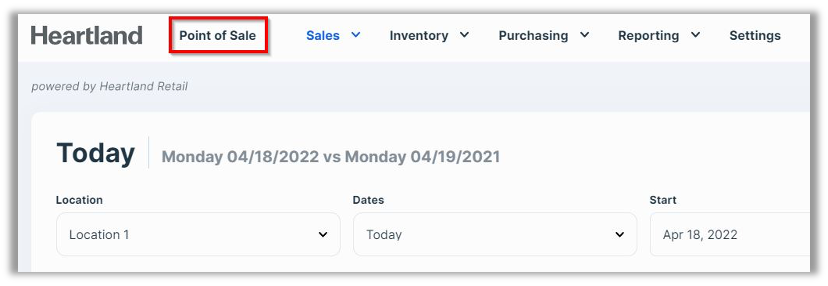
- In the Point of Sale left menu, click the Settings option as shown below.

- In the Settings popup, select PAX Payment Terminal from the Payment Devices The device should have a pre-configured IP address but you may have to hit Reload devices in order for it to display.
For the PAX A35, the Portico App must be open on the device, as described in the following section, for up to 30 seconds in order for the device to appear in the list.
The Portico App must remain open during transactions in order for the device to detect that a sale is in progress.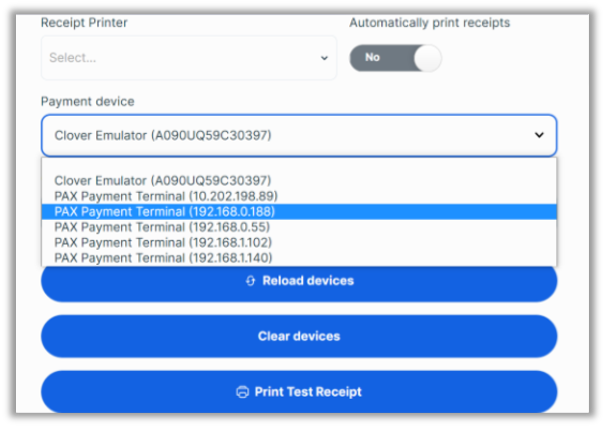
Congratulations! You are now ready to process credit cards with Heartland and your new payment device.
Payment Signature Capture
- When connected with the PAX devices via Heartland processing the signature capture will be enabled by default. In order to disable signature capture, you can do that for each individual station by going to the Settings | Location | Station page to disable signature capture for that station
- Once you capture the signature on the PAX device: we will be able to store that on the transaction and display it in the following areas:
Under the payments section when viewing a completed Sales Ticket
Under the payments section on a Sales Order
Using the A35 Payment Terminal
Launching the Portico Application
The following procedures launch the Portico application on the A35 device, allowing transactions to be processed. The device should remain in this mode for the POS to complete credit card transactions.
- From the main screen, find the Portico application.
- Double tap to launch the application.
Enabling / Disabling Printing
To enable or disable printing, follow these steps:
- Launch the Portico application as indicated above.
- Select the Menu icon in the upper right corner, enter the default password (916860).
- Select Operation Settings.
- In Print Support, select Enable or Disable, depending on preference.
Printing Credit Card Slips
To set up signature capture and printing through the A35 device, follow these steps:
- Launch the Portico application as indicated above.
- Select the Menu icon in the upper right corner, enter the default password (916860).
- Select Operation Settings.
- Select Signature Type.
- Select signature preference.
Select Print on Paper to print a receipt for guest to sign.
Select E-signature to allow guest to sign on device.
Completing Payment Transactions
The following procedures describe how to process a credit card transaction with the A35 device.
- In the POS, select an invoice to pay and then select a credit card payment.
- When the app displays the Please Enter Account prompt, enter the card’s number.
If the card has an EMV chip, you can dip the card or tap it against the front sensor.
If the card has no EMV chip, you can swipe it.
If these methods are unsuccessful, you can type the card number into the Please Enter Account box, then tap Confirm. - If you have dipped the card, remove the card when the device displays the ‘Remove card’ prompt.
The device will process the payment.
In the app’s settings, you can also configure the payment screen to include Apple Pay, Google Pay, and Samsung Pay as payment options.
Customer Facing Display
The PAX A35 can be used as a customer-facing display. In order to access this functionality, you must enable the Customer-Facing Display setting on the device.
Once you have configured the device, configure in Heartland Retail as described:
- Go to the Point of Sale screen and select the menu icon (displayed as ≡) located in the upper left corner.

- Go to Settings to open the connect app.
- The Customer Display Device dropdown will automatically display a list of all connected devices that support this feature.
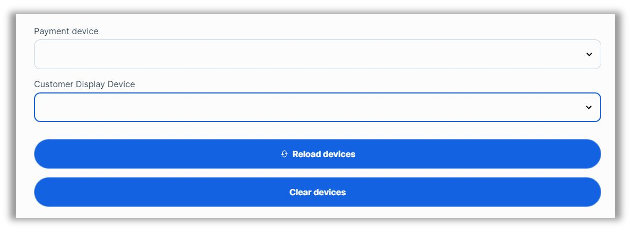
- Select your device from the list to enable Customer Display.